A small hand-tool woodworking shop starts with a stable bench and a reliable way to hold the wood. Those two elements matter more than a large collection of planes, saws and chisels.
Hand tools can reduce the floor space devoted to machinery, but the workpiece still needs room. You also need space to sharpen, store sharp edges safely and put unfinished projects aside.
Build the workshop around a few operations you want to learn. Add tools when a project creates a clear need.
Affiliate disclosure: This article contains affiliate links. If you purchase through these links, we may earn a commission at no extra cost to you.
Planning a compact workspace? Explore Ultimate Small Shop for workshop layout and storage ideas to compare with your available room.
Choose Your First Operations
Decide what you want to make before choosing the equipment.
A shop for small boxes and household repairs needs a different arrangement from one used to flatten rough boards and build large furniture.
For a manageable starting point, plan around:
- Measuring and marking.
- Cutting prepared stock to length.
- Trimming edges and fitting joints.
- Drilling appropriate holes.
- Assembling small projects.
- Maintaining cutting edges.
You can buy stock already surfaced or have larger preparation tasks completed elsewhere. This lets you learn joinery and fitting without making rough-lumber preparation your first challenge.
Hand tools can prepare rough stock, but that work requires suitable tools, technique, support and room for the boards.
Our hand tools versus power tools guide can help you decide which tasks to perform manually.
Plan Around the Workpiece
The absence of large machines does not eliminate space requirements.
A long board held in a short bench vise may extend into a doorway. A hand saw needs an unobstructed stroke. A plane needs room to begin and finish the cut while you maintain a balanced stance.
Draw the bench, then add your usual workpieces in their working positions.
Check whether you can:
- Move through the full tool stroke.
- Support projecting material.
- Reach clamps without stretching.
- Walk to the exit.
- Turn the project during assembly.
- Open nearby drawers and cabinets.
There is no single room size that suits every hand-tool shop. The useful measure is whether your intended operations fit comfortably. Our woodworking shop size guide explains how to assess that space.
Prioritize a Stable Workbench
Hand-tool work can apply substantial sideways force.
A bench that supports a heavy object may still slide or rack when you plane a board. Folding furniture intended for light tasks may not suit chopping or vigorous sawing.
Look for a bench arrangement that remains stable during your actual work. Check its construction, joints, feet and any required installation instructions.
Choose Height Around the Task
Planing, detailed fitting and assembly place different demands on your posture.
Test the working position before committing to a permanent bench height. Consider the height of the workpiece and any vise or raised workholding fixture, not just the bare benchtop.
Avoid choosing a height solely because another woodworker uses it.
Keep the Front Accessible
The front of the bench often needs room for clamps, vise handles and vertically held boards.
Deep cabinets beneath the top can interfere with clamping. Storage near your feet can also make it awkward to stand close enough for controlled work.
Include these details when evaluating a compact bench.
Give Each Operation Suitable Workholding
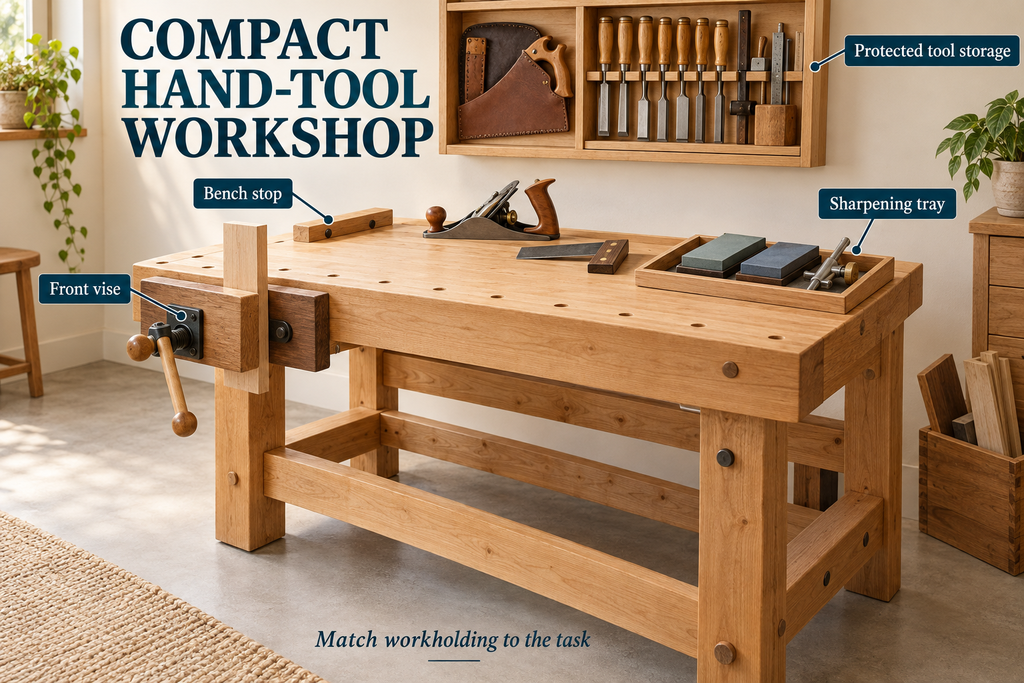
Workholding keeps the wood in position so you can control the tool.
Start with the tasks you expect to perform, then choose compatible arrangements.
| Operation | Possible workholding arrangement | What to check |
|---|---|---|
| Face planing | Suitable stop with additional restraint as needed | Board stays controlled throughout the stroke |
| Edge work | Bench vise or appropriate clamps | Projecting stock is supported |
| Small crosscuts | Bench hook or suitable sawing fixture | Fixture and workpiece remain controlled |
| Chisel work | Vise or clamps with backing where appropriate | Hands and body stay clear of the cutting path |
| Assembly | Clamps on a stable surface | Parts remain aligned and supported |
These are starting points rather than instructions for every cut.
A stop that resists force in one direction may not prevent sideways movement or lifting. Match the restraint to the operation.
CCOHS advises securing work for chisel use rather than holding it in one hand while chiseling with the other. Keep your supporting hand and body out of the tool’s possible path.
Our small-shop clamps and workholding guide covers the main options.
Build a Small Tool Kit Around Projects
Avoid treating a complete tool collection as a requirement for beginning.
A starter kit might include measuring and marking tools, a suitable saw, selected chisels, a plane, drilling tools and clamps. The exact choices should follow the project.
Measuring and Marking
Start with a dependable rule or tape, a square and a pencil. Add a marking gauge or marking knife when your joinery requires it.
Keep these tools somewhere protected from falling objects and loose cutting tools.
Sawing
Choose a saw appropriate to the material and cut. Check that its stroke fits the space and that you can support the work securely.
You do not need several overlapping saws before learning to use one suitable tool.
Planing and Chiseling
Choose the plane and chisel sizes around the operations you intend to learn.
Include sharpening supplies in the budget. Cutting tools that you cannot maintain will not remain useful simply because they were sharp when purchased.
Drilling and Assembly
A hand-powered drill may suit some tasks, while a compact powered drill may be more practical for others. A mainly hand-tool shop does not need to follow an all-or-nothing rule.
Choose the method that fits the task, workholding and environment.
Once you have identified the tools your projects require, review Ultimate Small Shop for ideas on organizing them within a compact work area.
Make Sharpening Easy to Set Up
Sharpening belongs in the workshop plan from the beginning.
Set aside a stable place for your chosen sharpening system. Follow the tool and abrasive manufacturers’ instructions for compatibility, lubrication, maintenance and storage.
A removable tray can make a small setup easier to deploy, provided it stays secure while you work.
Keep the supplies together:
- Suitable abrasives.
- A compatible honing guide, if used.
- Any required lubricant.
- Cleaning materials.
- Edge protection.
- Maintenance accessories for the chosen system.
You do not need to collect several competing sharpening systems. Learn a repeatable method suited to your tools.
Keep sharpening residue away from project surfaces and assembly areas. Clean and dry tools appropriately before storing them, and follow the abrasives’ drying and storage instructions.
Avoid sharpening over an unfinished project or beside loose hardware that could contaminate the abrasive surface.
Store Tools Without Exposing Cutting Edges
Compact storage should make tools easy to retrieve without reaching across sharp edges.
A shallow cabinet, fitted drawer or suitable tool chest can work well. Open racks may be convenient in a controlled workshop, while closed storage may be more appropriate in a shared home.
Give each sharp tool a protected position. Use suitable guards, holders or compartments so edges do not strike neighboring tools.
Do not leave handles projecting from the bench or cutting edges directed toward a walkway.
Store frequently used items within comfortable reach, but keep the benchtop available for work. A row of tools behind the project can become clutter when you turn an assembly or move a long board.
Keep children and other unauthorized users from accessing sharp tools.
Plan for Shavings, Dust and Finishing
Hand-tool woodworking is not dust-free.
Planes often produce shavings, while sawing, sanding and other operations can create dust. Plan suitable cleanup and dust controls for the activities you perform.
Collect shavings before they interfere with footing or access. Keep the floor around the bench clear, and use cleanup equipment appropriate to the material.
Do not assume a domestic vacuum is suitable for all fine woodworking dust.
Finishing also needs its own assessment. Follow the product label and safety data sheet for ventilation, ignition precautions, storage and waste handling.
If the room cannot meet those requirements, arrange another suitable location for that stage.
For work inside a living space, read our apartment woodworking setup guide before choosing dust-producing or finishing activities.
Account for Impact Noise
Hand tools can reduce reliance on motors, but they are not silent.
Mallet strikes, chopping and sawing can transmit sound through the bench and building. Choose working hours that fit the household and applicable property rules.
Keep the bench stable and inspect loose components that may rattle. Do not place it on improvised soft supports that allow it to move during use.
If impact noise remains disruptive, change the operation or move that task to a more suitable location.
Our quiet woodworking workshop guide explains the difference between reducing noise at the source and controlling its transmission.
Reserve a Place for the Current Project
A small shop becomes difficult to use when every surface holds unfinished work.
Give the current project a tray, shelf or other suitable storage position. Keep related hardware together and label components when their orientation matters.
Plan where glued assemblies can remain supported while curing. A workbench occupied overnight may be acceptable, but it should be an intentional choice.
Limit stored material to what you can support and retrieve safely. An oversized lumber pile can remove the space saved by choosing hand tools.
Test the Setup With One Modest Build
Choose a small project using prepared stock.
Work through marking, cutting, fitting, assembly and cleanup. Notice which problem slows you down most: a moving bench, awkward clamping, poor lighting or inaccessible sharpening equipment.
Improve that problem before buying more tools.
A useful hand-tool woodworking shop gives you control over the workpiece and room to use the tool. A stable bench, effective workholding and a manageable sharpening routine provide a strong foundation for developing your skills.
Ready to organize your workspace? Explore Ultimate Small Shop and assess its planning ideas against your projects, bench and storage needs.