To set up a small woodworking shop, start with the projects you want to build, measure your usable space, and choose tools that support those projects. Then arrange your work surfaces, material storage, dust control, and lighting around the work you will actually perform.
You do not need to purchase every machine before you begin. A smaller collection of suitable tools can be easier to organize, maintain, and use than a crowded workshop filled with equipment bought without a plan.
This guide walks you through the setup process, from measuring an empty space to testing your arrangement with a first project.
Affiliate disclosure: This article contains affiliate links. If you purchase through these links, we may earn a commission at no additional cost to you.
Prefer a collected planning resource? Explore the Ultimate Small Shop guide and compare its contents with the workshop you want to create.
1. Choose Your First Projects Before Choosing Tools
“Getting into woodworking” is a useful ambition, but it is too broad to guide equipment purchases.
Instead, identify two or three projects you would realistically like to complete. For example:
- A small wall shelf.
- A simple storage box.
- A freestanding bookcase made from prepared boards.
- A plywood cabinet.
- A small hand-tool project.
These projects involve different materials, cutting operations, and workholding needs.
Someone making small wooden boxes may prioritize a sturdy bench and precise hand tools. Someone working with plywood needs a practical way to handle, support, and cut panels.
Make a Project-to-Task List
Break your first project into operations.
| Project task | What your setup must provide |
|---|---|
| Measure and mark parts | A clear surface and suitable measuring tools |
| Cut material to size | An appropriate cutting method and stable support |
| Drill or assemble joints | Secure workholding and access around the parts |
| Smooth surfaces | A suitable method, with dust control where needed |
| Apply a finish | Appropriate conditions, product-specific precautions, and drying space |
| Store unfinished work | Somewhere the project can remain without blocking access |
This exercise identifies what you need now and what can wait.
Buying prepared lumber or having sheet goods cut to manageable sizes may also reduce the equipment and handling demands of your first projects. Check the supplier’s cutting accuracy and leave any necessary allowance for final sizing.
2. Measure the Space You Can Actually Use
The room’s overall dimensions do not tell the whole story.
A garage may also contain a vehicle, a freezer, bicycles, or household storage. A basement may have support columns, low ceilings, stairs, and equipment that needs service access.
Measure and record:
- Wall lengths and ceiling height.
- Door openings and door swings.
- Windows and fixed obstacles.
- Existing electrical outlets and lighting.
- Access to household equipment.
- Routes for bringing in materials.
- Space needed to remove completed projects.
Draw these features before adding tool positions.
Separate Storage Space From Working Space
Every tool has a stored footprint: the area it occupies when idle.
It also has an operating envelope: the space needed for the tool, workpiece, supports, operator, and movement during use.
A machine can fit against a wall while still being unusable there with long stock. Similarly, a folding bench saves storage space only if you have a suitable area in which to unfold and use it.
Do not choose machine clearances from a generic room-size rule. Follow the equipment instructions and account for the actual material you intend to handle.
For a closer look at these differences, read how much space a woodworking shop needs.
3. Decide Whether the Workshop Is Dedicated or Shared
A dedicated room allows tools and work surfaces to remain in position. A shared room needs a repeatable setup and pack-down process.
Before buying storage cabinets or building a large bench, decide which arrangement you have.
In a Dedicated Workshop
You can plan more permanent positions, but leave room for:
- Bringing materials through the door.
- Handling longer or wider workpieces.
- Assembly and clamping.
- Cleaning and maintenance.
- Temporary storage during a project.
Avoid treating every empty patch of floor as an opportunity for another machine.
In a Shared Workshop
Give each movable item both a working position and a storage position.
Think about what happens at the end of the session. Can you return the room to its other use without lifting heavy equipment, moving a wet finish, or placing unfinished work in an exit route?
A setup that takes too much effort to unpack may discourage short woodworking sessions. Simple, repeatable arrangements often work better than elaborate transformations.
4. Make a Complete Starting Budget
Separate your budget into two parts:
Space preparation: Work needed to make the location suitable, such as addressing moisture, improving lighting, or arranging professionally assessed electrical work.
Woodworking equipment: Tools, work surfaces, workholding, extraction, storage, and consumables.
This prevents a common budgeting mistake: spending nearly everything on cutting tools before accounting for the equipment needed to use them.
Include the Supporting Costs
| Purchase | Possible additional costs |
|---|---|
| Cutting tool | Suitable blade, work supports, extraction connection |
| Drill or driver | Bits, accessories, batteries or charger where applicable |
| Workbench | Vise, clamps, stops, or other workholding |
| Sander | Abrasives, extraction, replacement pads |
| Stationary machine | Stand or approved mobile base, delivery, required services |
| Storage system | Appropriate fixings, hardware, and installation |
| First project | Timber, fasteners, adhesive, finish, and practice material |
Prices vary, so build your estimate from current local or online quotations. Record what is included and what you already own.
Leave some money uncommitted until you have used the workshop. Early projects often reveal a need for better clamps, support, or lighting before another major tool.
Our woodworking shop setup cost guide explains how to organize the estimate. For purchase priorities, see setting up a woodworking shop on a budget.
5. Choose a Minimum Useful Tool Collection
Think in terms of capabilities rather than a fixed list of machines.
Your starting collection should support the operations in your first projects.
Measuring and Marking
Choose tools appropriate to the accuracy and dimensions of your work. A tape measure, square, ruler, and suitable marking tools form a practical starting point for many projects.
Keep these items accessible and protected from damage.
Cutting
Select a cutting method that matches your material and the available working space. Consider the complete setup, including support and workholding.
A table saw is not an automatic requirement for every beginner. Equally, a small handheld tool is not automatically suitable for every cut.
Drilling and Assembly
Plan how you will hold the parts while drilling and joining them. A drill cannot compensate for a workpiece that moves during the operation.
Smoothing and Surface Preparation
Choose a method suited to the material and finish you want. Include any required extraction and consumables in the purchasing decision.
Workholding
Clamps, a suitable vise, bench stops, and other task-appropriate devices can make a basic workshop much more useful.
Avoid buying a large assortment without knowing what it will hold. Start with the sizes and types needed for your first projects.
Use our essential tools for a small woodworking shop guide to develop a project-based shopping list.
Before committing to major purchases, you can review the Ultimate Small Shop offer as another planning resource. Compare its advertised guidance with your unanswered questions, and check current prices rather than assuming promotional savings will apply to your setup.
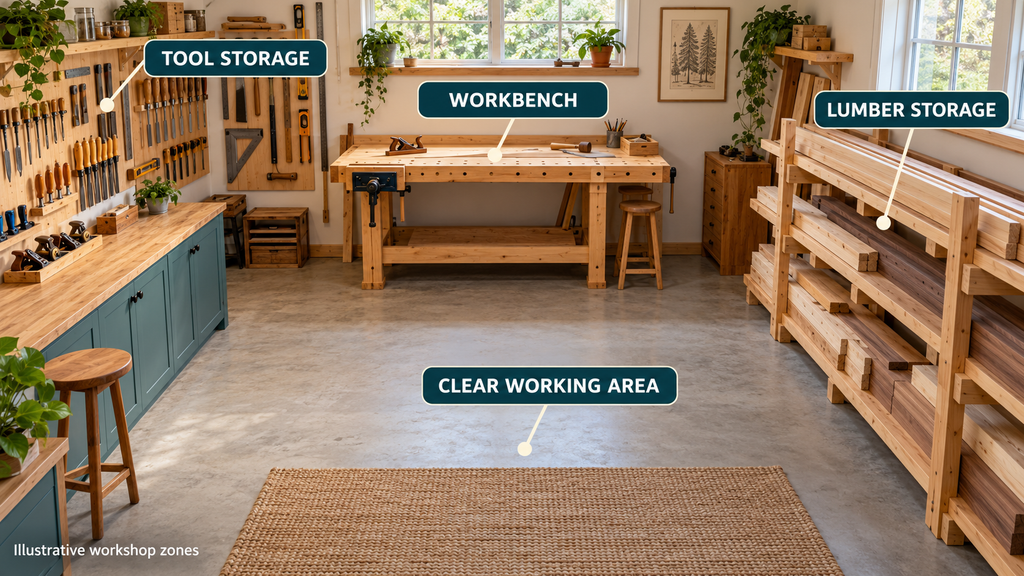
6. Arrange the Shop Around Material Flow
Imagine carrying a project through the workshop from beginning to end.
Where does the material arrive? Where is it stored? Where will you cut it, work on the parts, assemble them, and leave them while glue or finish dries?
A useful starting sequence is:
Material storage → preparation and cutting → bench work → assembly → finishing and drying.
This is a planning aid, not a requirement for five separate stations.
In a small shop, a surface may serve several purposes at different times. The key is to recognize when those uses conflict.
For example, a bench occupied by a clamped assembly may be unavailable for the next operation. Plan that temporary situation before it happens.
Test the Layout Before Making It Permanent
Use paper templates or floor tape to represent proposed equipment positions.
With equipment switched off and isolated, check the handling space for representative workpieces. Look for obstructions, difficult reaches, blocked controls, and collisions with walls or other tools.
Do not run machines merely to discover whether the layout provides sufficient clearance.
Our small woodworking shop layout guide covers this planning stage in more detail.
7. Include Dust Control and Services Before Finalizing Positions
Dust collection, lighting, and power requirements influence where equipment can sensibly go.
They should be part of the layout discussion before you install permanent cabinets or benches.
Dust Control
Plan to capture dust at or near the operation producing it. OSHA’s woodworking guidance identifies local exhaust ventilation as a primary method of controlling wood dust and emphasizes maintaining the extraction system.
Match extraction equipment and connections to the tool manufacturer’s requirements. A connector that physically fits does not, by itself, demonstrate adequate extraction.
Lighting
Check visibility where you will mark lines, read measurements, and inspect work. Consider shadows cast by your body, shelves, and equipment.
Test proposed lighting positions before fixing the final arrangement.
Electrical Supply
Make a list of equipment and its electrical requirements for a qualified electrician to assess where necessary. Include equipment that may operate together, such as a tool and its extractor.
Keep outlets and controls accessible, and plan cable routes that do not interfere with movement.
Access and Equipment Safeguards
Keep doors, exits, and required service areas clear. Install and use equipment with the safeguards specified by its manufacturer.
OSHA’s woodworking eTool highlights machine guarding, wood dust, and finishing chemicals among the important hazards to address. Its workplace guidance is a useful reference, although requirements applicable to a particular home workshop must be assessed separately.
8. Add Storage Where It Supports the Work
Organize storage around tasks rather than filling every wall with identical cabinets.
Keep frequently used items near the operation where you need them. Place heavier items where they can be handled without awkward lifting.
Give attention to three storage groups:
Tools and Accessories
Store related items together. For example, keep a tool’s commonly used accessories accessible without leaving them loose on the work surface.
Lumber and Sheet Goods
Plan secure storage with suitable supports and load capacity. Check the route needed to insert and remove material.
A rack is not useful if retrieving a board requires moving several machines first.
Work in Progress
Reserve somewhere for unfinished parts, assemblies, and offcuts worth keeping.
Set a limit on scrap storage. Keeping every small piece can gradually consume the space intended for active work.
9. Test the Workshop With One Manageable Project
Your first project is also a test of the workshop.
Choose something small enough to finish without requiring substantial new equipment. During the build, note where you repeatedly lose time or encounter awkward movements.
Ask:
- Did I have a stable place to hold every part?
- Could I retrieve tools without moving other equipment?
- Did assembly occupy a surface needed for another task?
- Were cords or hoses difficult to manage?
- Could I put everything away without blocking access?
Correct the most important problem before adding more equipment.
Our guide to first projects that test your workshop setup explains how to use a simple build to evaluate your space.
Example: Planning a Shop for Small Shelves and Boxes
Consider a beginner who wants to build shelves and small storage boxes using prepared boards.
An initial plan might include:
| Decision | Starting approach |
|---|---|
| Materials | Buy prepared boards in manageable sizes |
| Work surface | Use a stable bench suited to marking, holding, and assembly |
| Cutting | Select a suitable method with proper work support |
| Assembly | Keep relevant clamps and drilling accessories near the bench |
| Storage | Reserve a limited area for project boards and unfinished parts |
| Purchases to defer | Equipment for operations not yet needed, such as milling rough lumber |
This is an example of planning around project needs, not a universal equipment recommendation.
If the same person later wants to build large plywood cabinets, the plan needs revisiting. Sheet handling, cutting support, assembly space, and storage demands will change.
Small Workshop Setup Mistakes to Avoid
Several mistakes tend to come from buying equipment before understanding the work.
Choosing a layout from a photograph alone. The picture may not show stock movement, extraction connections, or the space outside the frame.
Buying a large machine for an occasional task. Consider whether prepared materials or an outside service could meet that need initially.
Building permanent storage too early. Use your tools before committing to cabinets designed around assumptions.
Forgetting work in progress. A project occupies space between sessions as well as during them.
Treating dust control and workholding as later upgrades. Include them in the initial task and budget assessment.
See our guide to small workshop setup mistakes for a more detailed review.
Your Small Workshop Setup Checklist
Before starting the first project, confirm that you have:
- Selected realistic beginner projects.
- Measured usable space and access routes.
- Checked equipment operating requirements.
- Budgeted for supporting equipment and consumables.
- Provided suitable work surfaces and workholding.
- Planned extraction, lighting, and electrical needs.
- Assigned storage for materials and unfinished work.
- Preserved access to exits and household equipment.
- Read the relevant tool manuals.
- Planned a simple first project to test the arrangement.
Keep these decisions together using our workshop planning checklist.
Frequently Asked Questions
Do I need a table saw to start woodworking?
Not necessarily. Start with the cuts and projects you need to complete, then compare suitable methods. Include work support, workholding, extraction, and operating space in that comparison.
Can I set up a workshop in a very small space?
Some small-scale work may be practical, but suitability depends on the tasks, materials, equipment, and surrounding environment. Room dimensions alone cannot establish whether a setup will work.
Should I buy all my tools before arranging the workshop?
Prepare a provisional layout and equipment list together. Check requirements before purchasing, then adjust the arrangement as you gain experience.
What should I improve first after the initial setup?
Address problems affecting safe, controlled work first. After that, focus on the limitation you encounter most often, such as awkward workholding, inadequate support, or a surface occupied by unfinished assemblies.
Start With a Workable Setup and Improve It Through Use
A small woodworking shop becomes more useful when its tools, surfaces, and storage support a clear set of tasks.
Choose a manageable project, measure your space, and plan the whole working setup before spending heavily. Then use your first builds to identify what deserves improvement.
If you would like an additional planning resource, view the current Ultimate Small Shop offer and decide whether its contents fit your workshop goals.