Small workshop setup mistakes often begin before the first project: buying equipment without a clear purpose, measuring only its stored footprint, or filling the room before considering material movement.
These decisions can leave you with tools you rarely use, awkward working positions, and expensive changes to benches or storage.
The best time to catch a problem is while the arrangement is still on paper. If your workshop is already established, you can use the checks below to identify what needs attention before making another purchase.
Affiliate disclosure: This article contains affiliate links. If you purchase through these links, we may earn a commission at no additional cost to you.
Planning a new workshop or reconsidering your current setup? Explore the Ultimate Small Shop guide and compare its contents with the decisions you need help making.
1. Buying Tools Before Defining Your Projects
A tool can be well made and reasonably priced without being useful for the work you intend to do.
The mistake is buying for an imagined future workshop while leaving immediate needs unresolved.
For example, purchasing equipment to prepare rough lumber may make little sense if your first projects use prepared boards and you still lack suitable clamps or work supports.
How to Recognize the Problem
Look at your shopping list. Can you name the project and operation that justify each item?
If the answer is mostly “I might need it someday,” the purchase may be premature.
What to Do Instead
Choose two or three realistic projects and list their operations. Identify which tasks your existing equipment can perform and which capabilities are missing.
Price the complete solution to each missing task, including accessories and supporting equipment.
Our guide to setting up a woodworking shop on a budget explains how to prioritize these purchases.
2. Planning Around Tool Footprints Alone
A machine’s stored dimensions do not describe all the space needed to use it.
Long boards, wide panels, supports, fences, handles, and the operator can extend beyond the footprint shown in a product photograph.
How to Recognize the Problem
The tool fits neatly into the room, but you cannot position or move the intended workpiece without hitting a wall, cabinet, or another machine.
What to Do Instead
Draw both the installed footprint and the working area.
Check the workpiece at the beginning, middle, and end of the operation. Include required supports and access to controls.
Use the manual for the exact equipment and accessories you intend to install. A clearance figure from a different machine is not a substitute.
Do not test an uncertain arrangement by operating the tool. Review it first with the equipment switched off and isolated.
3. Copying a Workshop Photograph Without Understanding It
Workshop photographs can provide ideas, but they show only one moment from one viewpoint.
They may hide an open doorway, a second work area, equipment stored outside the frame, or a machine moved before use.
A layout designed for small hand-tool projects may also be unsuitable for your materials and equipment.
How to Recognize the Problem
You can explain why the arrangement looks appealing, but not how your own project will move through it.
What to Do Instead
Borrow individual ideas and test them against your requirements.
Ask:
- What material sizes does this arrangement accommodate?
- Which items are permanent and which are moved?
- Where does assembly take place?
- What happens while a project occupies the bench?
- Can the finished piece leave through the available doors?
Use our small woodworking shop layout guide to develop an arrangement around your own workflow.
4. Building Permanent Storage Too Early
Permanent cabinets can be useful, but they also commit floor and wall space.
If you build them before understanding your working habits, you may discover that a cabinet blocks stock movement, occupies a better location for a bench, or stores frequently used tools too far away.
How to Recognize the Problem
You have detailed cabinet plans but have not yet tested the workshop layout with a project.
What to Do Instead
Begin with secure, practical storage that meets your immediate needs. Observe where tools are used and returned.
Before fixing a permanent cabinet in place, check:
- Door and drawer movement.
- Access to outlets and services.
- Workpiece travel.
- Reach to frequently used items.
- Space for future maintenance.
- Appropriate mounting and load support.
Several completed projects will often give you better information than an empty-room plan alone.
5. Leaving Dust Control Until After Buying Equipment
Dust extraction affects the budget, equipment positions, and hose routes. Treating it as an afterthought can lead to an awkward or incomplete setup.
A connection that physically fits a tool does not establish that the extractor provides suitable performance.
How to Recognize the Problem
You have selected the tools and their locations but have not checked extraction requirements, filtration, connections, or space for the equipment.
What to Do Instead
Assess dust control alongside each dust-producing tool.
Check the manufacturer’s requirements and account for the complete arrangement: extraction equipment, appropriate filters, connections, routing, and maintenance access.
OSHA’s woodworking guidance identifies extraction at or near the dust source as a primary control method and emphasizes maintaining the system. A clean-looking floor alone does not demonstrate that airborne dust is adequately controlled.
Keep the distinction between dust capture, room air filtration, and ventilation clear when planning the workshop.
If you prefer a collected resource while reviewing your setup, see the Ultimate Small Shop offer. Compare its planning guidance with your needs, and use equipment manuals and qualified advice for technical requirements.
6. Forgetting Assembly and Work in Progress
It is easy to give every tool a position while overlooking the project itself.
An assembly can occupy a work surface for hours or days. Clamps may extend beyond its edges, and you may need access from several sides.
How to Recognize the Problem
You can cut all the parts, but assembling them requires clearing the only bench or placing the project in a circulation route.
What to Do Instead
Draw the largest assembly you expect to make and include the space needed to work around it.
Then consider two situations:
- You are actively assembling the project.
- The project must remain in place between sessions.
A shared surface may still work, but plan the sequence. Do not assume that a bench occupied by a glue-up will also be available for the next operation.
Reserve a defined location for unfinished parts so they do not gradually spread across every surface.
7. Assuming Mobile Equipment Solves Every Space Problem
Mobile bases and tool carts can make shared spaces more flexible. They do not make the operating requirements disappear.
Moving a machine may also introduce questions about stability, floor condition, locking, and hose or cable management.
How to Recognize the Problem
The proposed solution to every layout conflict is “I will roll it out when needed,” but there is no clear operating position or changeover routine.
What to Do Instead
Give each movable item two positions:
- A parked position.
- A suitable operating position.
Check the route between them and follow the equipment and mobile-base instructions.
Consider the practical effort involved. If moving one tool requires relocating several others, the workshop may be technically rearrangeable but frustrating to use.
Never assume that a storage cart is suitable for operating a machine simply because it can carry its weight.
8. Spending the Budget on Tools and Forgetting the Rest
The advertised tool price is only one part of its cost.
Accessories, clamps, supports, extraction, materials, delivery, and necessary space improvements can significantly change the total.
How to Recognize the Problem
Your shopping list reaches the budget limit before you have included what is needed to complete a project.
What to Do Instead
Price each purchase as a complete working setup.
Use this checklist:
| Cost area | Question to ask |
|---|---|
| Accessories | What must be added before the intended operation is possible? |
| Work support | How will the material be supported and held? |
| Extraction | What equipment and connections are required? |
| Services | Does the space provide what the equipment needs? |
| Delivery | What will collection, transport, or handling cost? |
| Materials | Is there money left for the first project? |
| Uncertainty | Which necessary costs are still unknown? |
If the total is too high, reduce the project scope or postpone equipment. Do not remove necessary supporting provisions merely to preserve a purchase.
9. Judging Lighting and Access From an Empty Room
A room can appear bright and spacious before equipment, materials, and people are in position.
Once you stand at the bench, your body may cast a shadow over the work. A cabinet door may open into the route used to carry boards. Stored material may obstruct controls or household equipment.
How to Recognize the Problem
The plan works when the room is empty but becomes awkward during actual tasks.
What to Do Instead
Evaluate the room in its working arrangement.
Stand where you will measure, mark, and assemble. Check visibility at the surface rather than judging brightness from the doorway.
Review access with drawers, doors, and equipment components in the positions they occupy during use.
Include the needs of other people if the room is shared. A route that is clear only when nobody else enters is not a reliable arrangement.
10. Treating Finishing and Cleanup as Whatever Space Remains
Finishing requirements depend on the products and methods used. A corner near a dusty cutting area is not automatically suitable.
Cleanup also needs a practical arrangement. If putting tools away or collecting waste is awkward, clutter can become a recurring obstacle.
How to Recognize the Problem
There is no defined place for a project to dry, no plan for product-specific handling, and no routine for returning the workshop to a usable condition.
What to Do Instead
Read finish labels and safety data sheets before choosing the location and method. Account for ventilation, ignition sources, storage, and disposal instructions as applicable.
Create a short end-of-session routine:
- Return tools to their assigned places.
- Deal with waste using appropriate methods.
- Store materials and unfinished parts securely.
- Check that access routes remain clear.
- Leave equipment in the condition specified by its instructions.
Use our small workshop safety checklist to review the broader arrangement.
How to Correct an Existing Workshop Without Starting Over
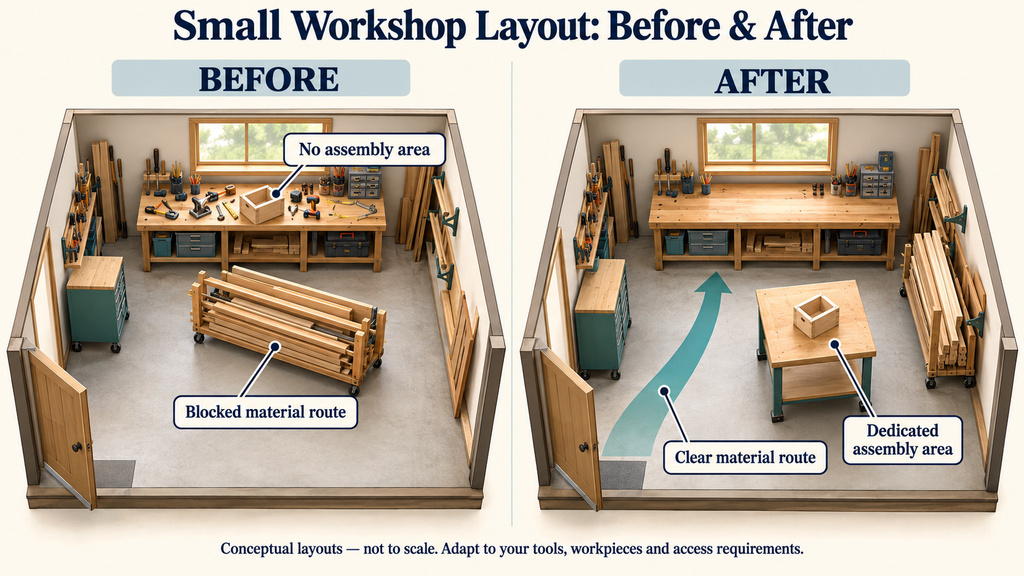
You do not need to redesign everything at once.
Begin with the problems that affect suitable operation and clear access. Pause the affected task until those issues are resolved.
Then identify the inconvenience that recurs most often. It might be moving stored boards to reach a tool or repeatedly clearing the bench for assembly.
Use a Simple Problem Log
| Problem observed | Likely cause to investigate | Possible change to test |
|---|---|---|
| Boards collide with a cabinet | Storage overlaps the stock path | Relocate storage or revise the operation |
| Bench is always occupied | No space for work in progress | Assign a suitable project-holding area |
| Clamps are difficult to retrieve | Storage is poorly located | Move appropriate storage nearer assembly |
| Hoses obstruct movement | Routing was not planned with the layout | Review compatible routing and equipment positions |
| Tools remain on the bench | Storage is inconvenient or insufficient | Simplify the return location |
These are starting points for investigation, not automatic fixes. Check that a proposed change does not create a new problem elsewhere.
After each adjustment, test the arrangement with the equipment off before returning to normal work.
For a complete review sequence, revisit our small woodworking shop setup guide.
Frequently Asked Questions
What should I check before buying another machine?
Confirm the task it will perform, its complete operating requirements, the total installed cost, and what will need to move or change in the workshop.
Should all tools be placed against the walls?
Not necessarily. Wall placement can preserve central space, but it may restrict workpiece movement or access. Choose positions according to the equipment and tasks.
Is a larger workshop the only solution to crowding?
No. Changing project scope, reducing unnecessary storage, using prepared material, or revising the layout may help. However, some operations genuinely require more space than the room can provide.
How do I know whether a layout change helped?
Look for a specific improvement: fewer unnecessary moves, suitable material support, clearer access, or a work surface available when needed. Appearance alone is not enough.
Plan Around the Work You Want to Complete
A practical workshop arrangement supports your projects from material storage through assembly and cleanup.
Before spending more, check whether your current difficulties come from missing equipment, unsuitable positioning, or too much competing for the same space. Often, the most useful improvement begins with a clearer plan.
Want an additional planning resource to consider? View the current Ultimate Small Shop offer and decide whether its contents address the setup decisions you are working through.