Workbench placement affects how comfortably you work, how easily you clamp a project, and how much usable space remains around your tools.
A bench against a wall can preserve the center of a small workshop. A freestanding bench provides access from more sides. A movable bench can serve different positions, provided it remains stable during the work you intend to do.
Start with the tasks you perform most often. Then check the bench position with a realistic project on top, clamps attached, and nearby storage open.
Affiliate disclosure: This article contains affiliate links. If you purchase through these links, we may earn a commission at no additional cost to you.
Planning your work surfaces alongside the rest of the shop? Explore Ultimate Small Shop as an additional planning resource.
Decide What the Bench Needs to Do
Before choosing a position, list the bench’s main jobs.
These might include marking, hand planing, sawing, drilling, sanding, installing hardware, or assembling small projects.
Different tasks make different demands on the surrounding space.
| Main task | Placement consideration |
|---|---|
| Marking and measuring | Clear surface, useful lighting, and nearby measuring tools |
| Hand planing | Stable bench and room for the workpiece and working motion |
| Vise work | Clearance for the handle, jaws, and projecting material |
| Drilling and sanding | Workholding, connections, and tool movement |
| Cabinet assembly | Access around the project and room for clamps |
| Hardware installation | Comfortable reach and visibility inside the assembly |
A workbench does not have to perform every job equally well.
If you are still choosing its design, read our guide to workbenches for small workshops.
Compare Wall, Freestanding, and Movable Positions
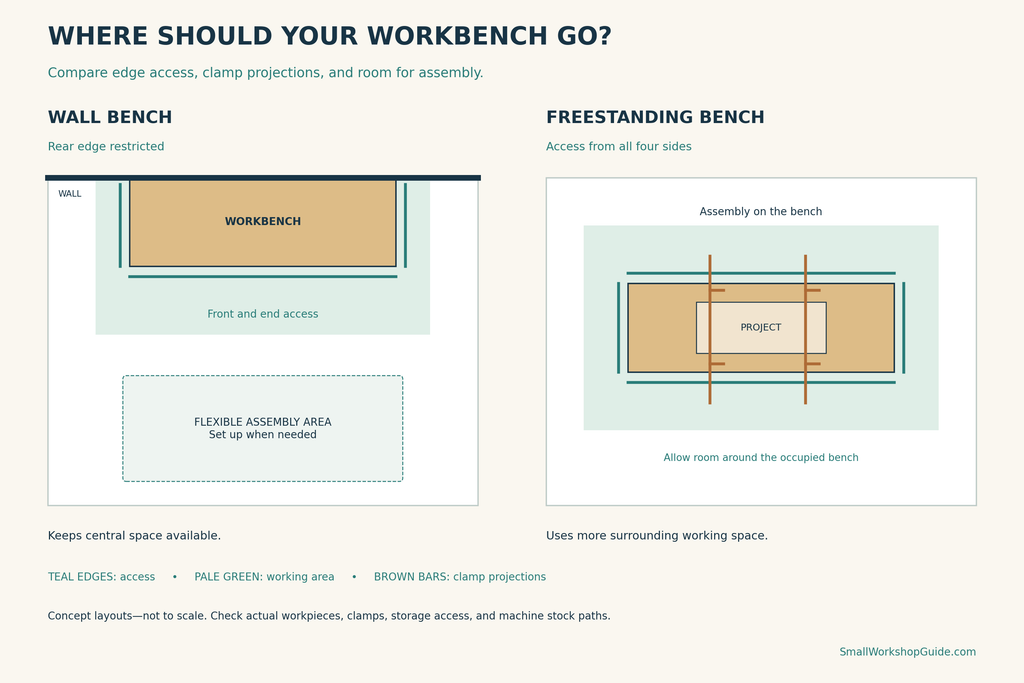
| Arrangement | Main advantage | Main limitation |
|---|---|---|
| Against a wall | Preserves central floor space and puts wall storage nearby | Restricts access to the rear edge |
| Freestanding | Allows access from multiple sides | Requires working space around more of its perimeter |
| One end against a wall | Provides access along both long sides | Occupies central space and limits one end |
| Movable | Lets the bench serve different positions | Requires a stable working setup and a clear moving route |
Against a wall
A wall position can suit marking, small assemblies, and work performed mainly from the front.
It also provides a convenient location for shallow storage and task lighting.
However, check whether the wall prevents clamps from reaching the rear edge. A deep top may also put tools at the back beyond comfortable reach.
Freestanding
A freestanding bench can be useful when you regularly work around larger projects.
Instead of turning a heavy assembly repeatedly, you may be able to move to another side.
The tradeoff is floor space. Draw the working area around the bench, not just its tabletop.
One end against a wall
This arrangement can offer access to both long sides while keeping one end near storage or services.
Check that the projecting bench does not divide the room into narrow passages or interrupt a machine’s stock path.
Movable
A movable bench can park near a wall and move into an open area for assembly.
It must still provide the stability required for the task. Follow the base or caster instructions and do not assume that locking wheels makes every bench suitable for forceful hand-tool work.
Plan Around the Project, Not Just the Benchtop
A bench may fit in the room while the project on it does not.
Picture the largest assembly you expect to handle regularly. Include clamps, projecting boards, and the space needed to reach its joints.
For example, a cabinet can prevent you from reaching wall-mounted tools even when the empty bench feels convenient.
Check these questions:
- Can I reach the work without leaning across the entire surface?
- Can I access the sides needed for this task?
- Will clamps project into a walking route?
- Can I open the vise fully?
- Can the project turn or move without striking nearby equipment?
- Can the completed assembly leave the room?
For the wider relationship between benches and machines, see our small woodworking shop layout guide.
Leave Room for Clamping and Workholding
Workholding equipment extends beyond the bench’s footprint.
A front vise needs space for its handle and the workpiece. Long stock held vertically or horizontally may extend well beyond the top.
Clamps may require access beneath an edge. Under-bench cabinets, aprons, and nearby walls can interfere with that access.
Test the actual clamp positions
Place a representative project on the proposed bench location and identify where clamps would go.
Check the handles and bars as well as the jaws. A clamp that attaches successfully may still project into your working position.
For a wall bench, decide whether the inaccessible rear edge matters for your regular tasks. If it does, consider a different position or a separate assembly arrangement.
Avoid choosing a fixed wall gap without testing how it affects reach, storage, and workholding.
Keep the Bench Outside Machine Stock Paths
The bench often seems like a convenient place to use otherwise empty space behind a machine.
That space may be needed when a long board or panel moves through the operation.
Overlay the bench and its occupied working area on the machine layout. Include the project sitting on top.
A tabletop may clear passing stock while a cabinet assembled on it does not.
Also check nearby drill presses and router tables. Their workpieces can extend beyond the machine footprint. Our router table and drill press placement guide covers those conflicts.
Using a bench as outfeed support
A bench can serve this purpose only when its design, height, position, and compatibility suit the machine and operation.
It must also remain available. A bench holding a glue-up cannot simultaneously provide a clear material path.
See our infeed and outfeed support guide before combining these functions.
Position Lighting From the Working Side
Check lighting while standing or sitting where you will actually work.
A light behind you may leave your body casting a shadow across a marked line. A cabinet above the bench can also block light from reaching the surface.
Natural light can be useful, but its direction and intensity change. Check the setup during the hours you normally use the workshop.
Task lighting should help you see the work without creating troublesome glare or obstructing tools and materials.
For a complete approach, read our workshop lighting guide.
Check Height and Reach Together
Bench height affects posture, but placement determines whether you can approach the work properly.
A cabinet base that prevents your feet from getting close may make you lean forward. A deep bench against a wall can encourage repeated reaching.
CCOHS guidance recommends keeping usual operations within easy reach and adapting working height to the person and task.
Remember that the workpiece adds height. Installing hardware inside a tall cabinet on the bench is different from marking a flat board on the same surface.
Use our workbench height and size guide to assess these dimensions before committing to permanent storage or wall fixtures.
Comparing a wall bench with a more flexible arrangement? Take a look at Ultimate Small Shop while developing your workshop plan.
Give Assembly Its Own Space—or Its Own Time
An assembly area does not always require a permanent second table.
In a compact shop, it may be a shared surface used at a particular stage of the project.
What matters is that the area is suitable and available when needed.
A separate assembly surface
This can allow the main bench to remain useful while a project is clamped.
However, it needs space around the occupied project, not merely enough floor area for its legs.
A shared bench
One bench can handle both fabrication and assembly if you plan the transition.
Clear the surface, store tools, and move completed parts into position before beginning the glue-up.
The main limitation is occupied time. Consider what work you can continue while the assembly remains undisturbed.
Our assembly table versus workbench guide explains when combining the roles makes sense.
Put Frequently Used Items Within Reach
Place common measuring tools, marking tools, and workholding accessories near the bench.
Store them where you can retrieve them without reaching over an active tool or moving a large project.
Avoid filling every available wall area simply because it is close. Deep shelves and projecting storage can interfere with long boards or the view of your work.
Also test drawers in their open positions. A drawer that opens into the only passage can interrupt work even when the closed cabinet fits neatly.
Keep a small staging area for project parts so the main surface does not become permanent storage.
Test Two Realistic Shop Conditions
Evaluate the bench in at least two situations.
Condition 1: Routine bench work
Set out a typical workpiece and the tools you would use.
Check your approach, lighting, workholding, and access to storage.
Condition 2: Assembly in progress
Mock up a larger project with clamps or lightweight substitutes.
Check whether you can still reach needed items, use other equipment where appropriate, and leave the room.
This second condition often reveals conflicts hidden by an empty-shop drawing.
Our woodworking shop workflow guide explains how to plan around projects occupying space between operations.
Use Floor Tape Before Fixing the Position
Mark the proposed bench footprint on the floor.
Add the vise projection, open drawers, clamp extensions, and the area occupied by a representative project.
Walk through the intended tasks with tools switched off. If the bench is movable, test the route between its parked and working positions.
Do not make permanent changes until the arrangement supports the work you expect to do.
A short placement checklist helps:
- The bench is stable for its intended tasks.
- Necessary edges are accessible.
- Workholding does not obstruct movement.
- Lighting reaches the actual work area.
- Storage opens and remains reachable.
- Machine stock paths remain clear.
- Assembly does not block the exit.
Frequently Asked Questions
Should a workbench face the wall?
A wall position can work well for tasks performed from one side. Choose another arrangement if rear-edge access or larger assemblies are important.
How much space should I leave around a workbench?
Base it on your movements, workpieces, clamps, nearby equipment, and access requirements. One clearance figure cannot cover every shop.
Is a freestanding bench always better?
No. Its additional access is useful only if you need it and the surrounding working space fits the room.
Can a movable bench replace a fixed bench?
Possibly, depending on its construction and the work. Verify stability in the operating position, especially for tasks involving substantial force.
Should my assembly table be next to the workbench?
It can be convenient, but adjacency is less important than access and clear material movement. Test the occupied arrangement before deciding.
Choose the Position That Supports Your Work
Good workbench placement gives you access to the workpiece, useful lighting, dependable workholding, and room for the project as it grows.
Compare wall and freestanding positions, then test the bench with an assembly on top. If the space must serve several purposes, plan when and how those uses change.
Ready to develop your broader workshop arrangement? Explore Ultimate Small Shop here.