A practical woodworking shop workflow gives every project a clear route through the room. Materials enter, parts are prepared, joints are made, and the project moves into assembly without repeatedly blocking the next operation.
You do not need a large workshop or a separate station for every task. In a small shop, the same bench or open floor area may serve several purposes at different times.
The goal is to plan those changes deliberately. Decide where materials will go, where completed parts will wait, and what must be cleared before the next stage begins.
Affiliate disclosure: This article contains affiliate links. If you purchase through these links, we may earn a commission at no additional cost to you.
Planning the room around your projects? Explore Ultimate Small Shop as an additional workshop-planning resource.
What Is Woodworking Shop Workflow?
Workshop workflow is the sequence of operations and movements needed to complete a project.
It includes more than where you place your tools. It also covers:
- Bringing materials into the room.
- Selecting and organizing stock.
- Moving workpieces between operations.
- Keeping related parts together.
- Making room for assembly.
- Protecting projects while glue or finishes cure.
- Returning the shop to a usable condition.
A typical project might follow this route:
Receive and store → prepare parts → cut joinery → dry-fit → assemble → finish
The exact sequence depends on the material, construction method, and finish. Some surfaces are easier to finish before assembly, while some parts need to be fitted after other components are together.
Treat the sequence as a project plan rather than a rule that every build must follow.
Start With One Representative Project
Choose something similar to what you expect to build regularly.
A small cabinet, side table, or bookshelf gives you a more useful planning exercise than an imaginary project requiring every tool you own.
Write down:
- The materials you will bring inside.
- The main preparation operations.
- The joints and fittings required.
- The largest assembly.
- Where the project will wait between sessions.
- How it will leave the shop.
Then trace that sequence on your floor plan.
If you need to establish the room’s main work areas first, use our small woodworking shop layout guide.
Stage 1: Receive and Store Materials
Your workflow begins at the entrance.
Before buying material, check whether you can bring it through the doorway and turn it into the storage area. A long board or large panel may fit through an opening but still be difficult to maneuver once inside.
Keep the receiving route available. Avoid making the first step of every project a major rearrangement.
Give incoming material a destination
Plan a specific place for boards, panels, and purchased components.
Material should not have to rest on the assembly table simply because no other space is available. That creates a conflict before work begins.
Store materials on suitable supports and within the storage system’s capacity. For ideas on organizing boards in limited space, see our small-shop lumber storage guide.
Separate project stock from general leftovers
Keep the material selected for the current project identifiable.
Label it or group it separately from miscellaneous offcuts. This helps prevent a board intended for a visible component from becoming a test piece.
Set aside suitable scraps for setup and test cuts when the project calls for them.
Stage 2: Choose the Right Material Path
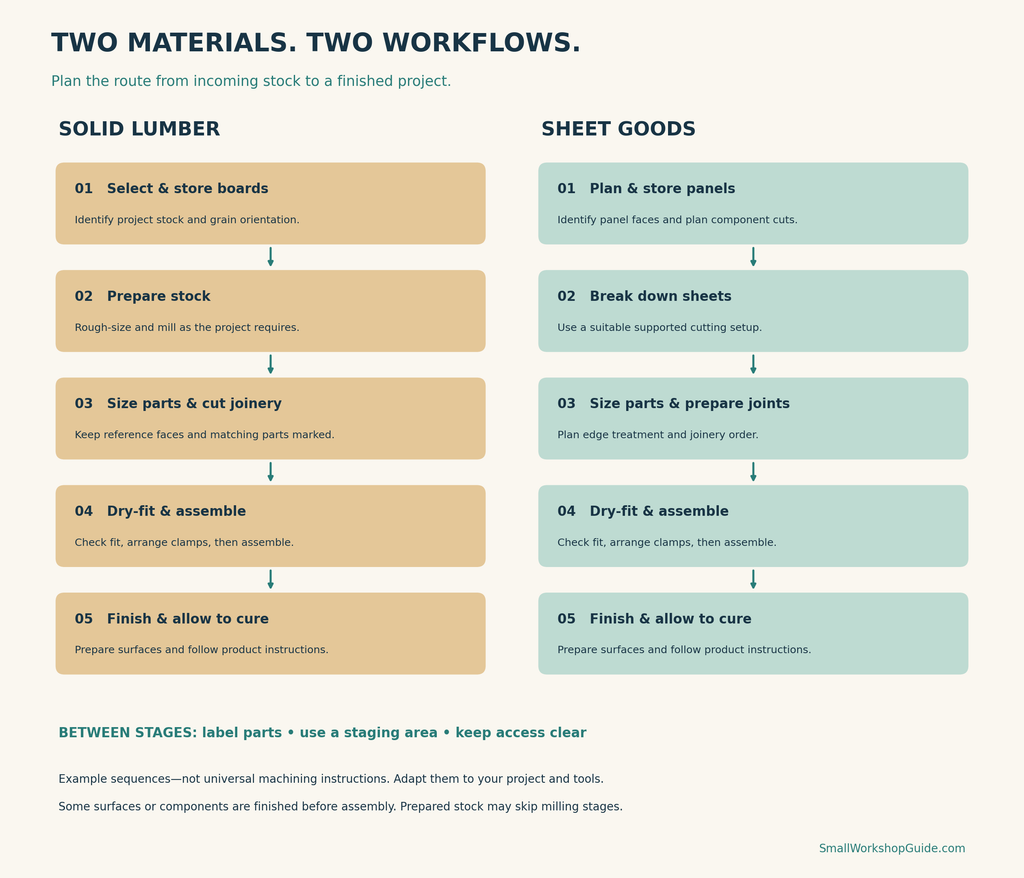
Solid lumber and sheet goods usually place different demands on the shop.
| Planning issue | Solid lumber | Sheet goods |
|---|---|---|
| Initial handling | Board length, weight, and condition | Panel size, weight, and turning space |
| Preparation | May require flattening and thicknessing | Often begins with panel breakdown |
| Parts organization | Grain, reference surfaces, and matched components | Panel identity, face orientation, and edge treatment |
| Space pressure | Long stock traveling through equipment | Supporting and moving large panels |
| Assembly | Depends on the project and joinery | Cabinet parts can become bulky quickly |
A solid-lumber workflow
A typical route for rough lumber may include:
Select boards → rough-size as appropriate → establish flat and square reference surfaces → size parts → cut joinery → dry-fit → assemble
The precise preparation order depends on the board’s condition, tool requirements, and project. Keep workpieces within the equipment’s permitted dimensions throughout the process.
If you buy prepared stock, some milling stages may be reduced or unnecessary.
Plan the material path around your actual preparation method. Our planer and jointer placement guide discusses the space needed when those machines are part of the setup.
A sheet-goods workflow
A typical cabinet project may follow:
Plan panel cuts → break down sheets → size components → apply edge treatment and cut joinery in the chosen order → dry-fit → assemble
Decide where the largest panels will be supported before bringing them into the shop.
Having a supplier reduce panels to manageable sizes can simplify handling, provided you leave the allowances required by your project.
Where a table saw is involved, check the complete workpiece path and support arrangement. See our table saw placement guide for layout considerations.
Stage 3: Prepare Parts Without Losing Their Identity
Once boards or panels become individual components, organization becomes more important.
Label parts as you prepare them. A simple system might identify:
- Left and right sides.
- Top and bottom.
- Front and back.
- Inside and outside faces.
- Matching pairs.
Use markings appropriate for the material and finish, and keep them away from finished visible surfaces where practical.
Establish a parts staging area
Reserve a shelf, cart, or suitable section of a bench for completed parts.
This area should be accessible without intruding into an active machine’s working space.
Separate parts awaiting an operation from parts that have completed it. Even two labeled trays can help on a small project.
The staging area prevents a common problem: putting finished parts on the next tool you need to use.
Group compatible operations
It can be useful to complete the same operation on several matching parts while the setup remains unchanged.
Check a test piece or first component before processing the whole group. A setup error repeated across every part creates more work than it saves.
Group operations when it supports accuracy and safe handling, rather than simply trying to minimize every tool change.
Stage 4: Plan Joinery and Dry-Fitting
Joinery often brings parts back to the bench, router, drill, or another previously used station.
Some backtracking is normal. The layout should make it manageable.
Keep reference markings visible and store project-specific jigs or setup notes with the parts.
Dry-fit before preparing glue
Assemble the relevant components without glue to check fit and orientation.
This is also a workflow test:
- Can you reach the joints?
- Can clamps be positioned without hitting storage?
- Is the assembly surface large enough?
- Are the required tools within reach?
- Where will the clamped project remain?
Resolve these issues before glue introduces a time limit.
Our workbench and assembly-area placement guide explains how to reserve useful access around the project.
Stage 5: Protect Assembly Space
Assembly space is easy to underestimate because a stack of parts occupies much less room than the completed object.
Plan for the project with clamps attached. Include the space needed to check alignment and work around it.
Prepare the area before starting
Clear unrelated tools and material from the assembly surface.
Arrange the parts, clamps, adhesive, and any project-specific tools in advance. Follow the adhesive manufacturer’s instructions for application and working time.
Keep the exit route clear throughout the operation.
Account for occupied time
A project may need to remain undisturbed after assembly. Plan what other work can continue while that surface is occupied.
Do not assume that a mobile assembly table can always be moved. A fresh glue-up may need to stay where it is.
Comparing layouts for cutting, staging, and assembly? Take a look at Ultimate Small Shop while developing your overall workshop plan.
Stage 6: Separate Dust-Producing Work From Finishing
Finishing creates a different set of workspace needs.
Plan for surface preparation, application, and drying or curing according to the chosen product’s instructions. Some components may be easier to finish before assembly, particularly where access will become restricted.
Include dust capture in the working setup
When planning cutting and sanding operations, include the extraction connection and hose route.
Capturing dust at or near the source is a central control described in OSHA’s woodworking guidance. Do not treat dust collection as something to consider only after equipment placement is complete.
Plan a suitable finishing arrangement
A clean-looking corner alone does not establish that an area is suitable for finishing.
Ventilation, ignition sources, product handling, and drying conditions need consideration. Follow the finish label and safety information.
For more detail, see our small-workshop finishing-area guide.
Make Shared Areas Work in Stages
A compact workshop can use one area for several operations if the transitions are planned.
| Current use | Before changing the area |
|---|---|
| Cutting | Stop equipment, clear offcuts, and put tools in their designated positions |
| Joinery | Store jigs and keep completed parts labeled |
| Assembly | Clear the surface and arrange parts and clamps |
| Finishing | Establish the product-appropriate clean working conditions |
| Storage or parking | Return equipment and preserve required access |
For mobile equipment, include both stored and operating positions on the drawing.
Use our workshop layout templates guide to compare these arrangements without repeatedly moving the equipment itself.
Identify the Step That Repeatedly Stops Progress
Notice where work stalls.
Perhaps every cut requires moving the assembly table. Perhaps you cannot reach clamps when a project occupies the bench. Or perhaps finished parts keep covering the next machine.
Write down the interruption and its cause.
| Recurring problem | Possible planning change |
|---|---|
| Cut parts collect on machine tables | Add a designated staging shelf or cart |
| Long stock hits stored items | Reassess the complete material path |
| Glue-ups occupy the only bench | Plan a separate suitable assembly surface |
| Hardware becomes separated from parts | Keep a labeled project container |
| Each operation requires extensive rearranging | Compare operating layouts and reduce unnecessary floor storage |
Change one recurring problem at a time. Then test the revised arrangement on the next project.
End Each Session Ready for the Next Step
Before leaving, return tools to their places, organize project parts, and clear the access routes.
Leave a brief note stating the next operation and any measurements or checks still required.
A useful note might read:
“Side panels sized. Check shelf fit before cutting remaining joinery.”
That helps you resume work without guessing which parts are finished or repeating previous checks.
Frequently Asked Questions
Does workflow need to run in a straight line?
No. A small shop may use a loop, a U-shaped arrangement, or shared stations. The aim is manageable material handling and clear transitions.
Should lumber storage always be beside the entrance?
It can reduce carrying distance, but the location must also suit support, access, and the room’s other needs.
Is it worth batching every operation?
Not always. Group matching operations where useful, but preserve reference surfaces, check accuracy, and follow the project’s required sequence.
What is the easiest workflow improvement?
Look for one repeated interruption. Providing a designated place for project parts is often a practical starting point.
Plan the Movement, the Waiting, and the Reset
A useful woodworking shop workflow accounts for the whole project: incoming material, preparation, joinery, assembly, finishing, and the space occupied between sessions.
Trace one representative build through your room. Give parts somewhere to wait and identify what must change when a shared area takes on its next job.
Ready to develop your workshop plan further? Explore Ultimate Small Shop here.