A portable woodworking shop needs to work in two conditions: fully set up for a project and completely packed away. Plan both before buying equipment.
The working arrangement needs stable surfaces, secure workholding, suitable dust control and room to handle materials. The stored arrangement needs accessible tools, protected cutting edges and a place for unfinished projects.
A folding bench is only one part of that system. The goal is to create a workshop you can deploy, use and put away without repeatedly solving the same problems.
Affiliate disclosure: This article contains affiliate links. If you purchase through these links, we may earn a commission at no extra cost to you.
Looking for compact workshop ideas? Explore Ultimate Small Shop and compare its planning suggestions with your working and storage space.
Decide What “Portable” Means for You
Portable workshops usually fall into one of three arrangements.
| Arrangement | Typical movement | Main planning concern |
|---|---|---|
| Fold-away workshop | Equipment unfolds within the same room | Folded size and operating space |
| Rolling workshop | Carts move between storage and work positions | Floor condition, stability and access |
| Transportable workshop | Equipment travels through doors, stairs or in a vehicle | Weight, carrying dimensions and loading |
A heavy bench on casters may work well in a garage but be unsuitable for carrying downstairs. A lightweight folding table may travel easily but lack the stability needed for demanding hand-tool work.
Choose around the movement you will actually make.
If you are freeing space for a vehicle, our shared garage workshop guide explains how to coordinate woodworking with parking.
Measure the Stored Setup First
Start with the storage area.
Measure its usable width, depth and height, then check how equipment will enter and leave it. Include cupboard doors, shelves, handles and narrow turns along the route.
List everything that must fit:
- Folding bench or supports.
- Portable tools and cases.
- Clamps and workholding accessories.
- Dust extractor and hoses.
- Measuring tools and small parts.
- Removable tops or support panels.
- Current project materials.
Include protruding handles, folded legs and accessories. The advertised size of a work surface may not describe the complete folded package.
Also check retrieval order. If the bench is behind several heavy boxes, even a short session starts with unnecessary lifting.
Keep frequently used equipment accessible without dismantling the whole storage arrangement.
Plan the Deployed Space Separately
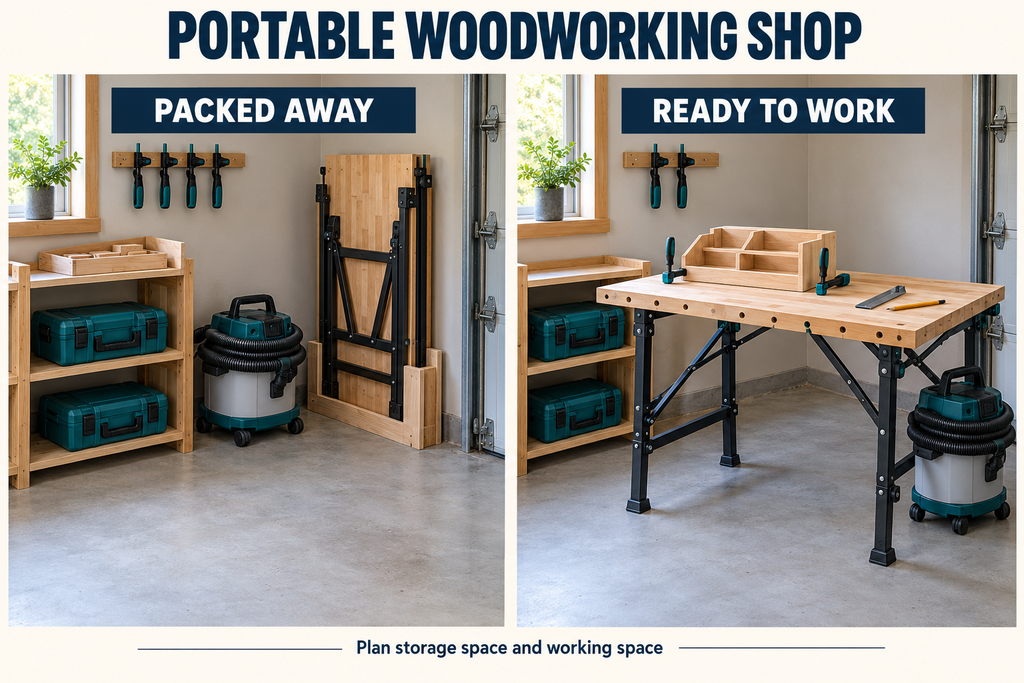
Now draw the workshop ready for use.
Include your standing position, the workpiece, clamps, supports and the path to the exit. A tabletop that fits in a corner may become unusable when a board projects from both sides.
Allow for the complete task rather than the equipment footprint.
For example, assembling a small cabinet requires space to walk around it and reach clamps. Cutting a longer component requires appropriate support before, during and after the cut.
Avoid relying on an open doorway as the only way to accommodate normal workpieces.
For a narrow garage, the planning checks in our one-car garage workshop guide can help identify conflicts between equipment, materials and access.
Choose a Main Work Surface
Select the main surface around the operations you expect to perform most often.
Folding Workbench
A folding workbench can provide a compact assembly and clamping station.
Check its intended uses, working height, folded dimensions, weight and locking arrangements. Confirm that its clamping features suit the work you plan to do.
A published load capacity does not, by itself, establish suitability for sideways forces from planing, sawing or levering.
Portable Supports With a Removable Top
Separate supports and a removable top can provide a larger surface that stores in pieces.
The supports, top and connections must form a stable system suited to the task. A loose sheet placed across two supports is not automatically an appropriate machine stand or heavy-work bench.
Plan how the top is secured and how you will lift and store it.
Wall-Mounted Folding Bench
A wall-mounted bench can keep the floor available when folded, but it depends on suitable wall construction, fixings and installation.
It also remains tied to one location. Check the deployed depth, support arrangement and whether the folded bench obstructs anything.
Our comparison of folding and wall-mounted workbenches explains these options in more detail.
Make Stability Part of Every Setup
Portable equipment changes position frequently, so check stability each time you deploy it.
Place supports on suitable ground or flooring. Open legs fully and engage the locking mechanisms according to the manufacturer’s instructions.
Check for damaged components, loose connections and rocking before placing the workpiece.
For rolling equipment, follow the required operating arrangement. Depending on the design, that may involve brakes, leveling feet or lowering the equipment off its wheels.
Do not assume all mobile bases work the same way.
Our guide to mobile bases and tool carts covers how to match mobility arrangements to the equipment.
Keep hands clear of folding joints and pinch points during setup and pack-down.
Build Workholding Into the System
A portable surface needs a reliable way to secure the workpiece.
Choose clamps, stops, dogs or a vise that are compatible with the bench and intended operation. Check access beneath the surface as well as above it.
Folding frames can obstruct clamp placement. A clamp that fits the tabletop edge may contact a leg brace when tightened.
Test common arrangements before starting a project:
- Holding a board flat.
- Securing a component upright.
- Supporting an overhanging part.
- Clamping an assembly without distorting it.
- Keeping hardware clear of a cutting path.
Store the workholding accessories with the bench where practical. A portable setup becomes frustrating when its essential clamps live in another room.
Once you have chosen your work surface and storage arrangement, review Ultimate Small Shop for additional ways to organize a compact workspace.
Use Modules That Are Easy to Handle
Divide equipment into manageable groups rather than packing everything into one large container.
For example, keep measuring tools together, store drilling accessories in a separate case, and use a dedicated tray for the current project.
Choose containers you can lift and carry comfortably along the actual route. Include stairs, doorways and vehicle loading when assessing weight.
A large toolbox may save storage space but become awkward once filled.
Keep heavier items low in storage where suitable, and secure stacked containers according to their design. Avoid a tall, unstable pile that must be dismantled to reach a frequently used tool.
Labels can help distinguish similar cases without opening each one.
Make Alignment Repeatable
Moving a setup can change its alignment.
A support that matched your work surface yesterday may sit differently on another part of the floor. A stop attached to a removable top may shift during transport.
Use reference marks, labeled components and dedicated storage to make reassembly easier, then verify the setup before use.
Check:
- Support height and stability.
- Connections between modular surfaces.
- Stops and guides relevant to the operation.
- Workpiece clearance.
- Tool mounting and guarding.
- Access to controls.
Follow the tool’s instructions for support positioning. Do not assume every support should be exactly level with every machine surface.
Repeatable setup means returning to a known arrangement and checking it—not relying on marks alone.
Include Dust Collection and Power
Reserve space for dust collection equipment and its accessories in both the working and stored layouts.
Check that the collection system suits the tool and operation. Keep connections accessible and route hoses away from walking areas and moving workpieces.
Protect hoses from crushing during storage. Give adapters and connectors a designated container so the system can be assembled without searching.
For corded equipment, follow the tool manufacturer’s guidance on supply and extension cords. Use cords rated for the equipment and environment, inspect them before use, and keep connections away from water.
The Electrical Safety Foundation International advises against using extension cords as substitutes for permanent wiring. If you repeatedly work in the same location, assess whether a suitable permanent electrical arrangement is needed.
Battery-powered tools reduce some cord handling, but chargers, dust extraction and lighting may still need a supply.
Give Unfinished Projects a Storage Position
A workshop can fold away while the project remains too large to store.
Before starting, decide where components, glued assemblies and completed work will stay between sessions.
Use labeled trays for small parts and suitable supports for larger pieces. Keep hardware with the relevant project.
Plan glue-ups around the time and support they require. Do not depend on moving an assembly before it can be handled appropriately.
If the project occupies the only work surface overnight, make sure that surface can remain deployed without blocking access or another essential use of the room.
Finishing needs its own plan for application, drying, ventilation and product storage.
Follow a Consistent Setup and Pack-Down Order
A simple sequence reduces forgotten equipment and unnecessary handling.
Setup
- Clear and inspect the work area.
- Position and secure the bench or supports.
- Install the top and required workholding.
- Position tools and workpiece supports.
- Arrange dust collection, lighting and power.
- Check stability, alignment and clear access.
Pack-Down
- Stop equipment and wait for moving parts to stop.
- Disconnect or secure tools as instructed.
- Store the project and loose hardware.
- Clean tools, surfaces and the surrounding area.
- Remove accessories and fold equipment as instructed.
- Return everything to its designated position.
Store equipment in the reverse order you need it when practical. The first item required for setup should be easy to retrieve.
Test the Complete System Before Expanding
Begin with one manageable project and run the entire setup-and-storage routine.
Notice what takes effort: lifting a top, reaching a case, connecting a hose or finding somewhere for the workpiece.
Improve those bottlenecks before adding more equipment.
A useful portable woodworking shop is one you can deploy confidently and put away consistently. Start with a stable surface, compatible workholding and accessible storage, then expand when a specific project justifies it.
Ready to plan your portable setup? Explore Ultimate Small Shop and evaluate its ideas against the space you have both during and between sessions.