A shared garage workshop works best when changing between parking and woodworking is predictable. Every movable item needs a storage position, every unfinished project needs somewhere to stay, and every session needs time for cleanup.
The challenge is not simply fitting tools beside a car. It is making the garage usable for both purposes without repeatedly rearranging everything.
Start with two layouts: one showing the vehicle parked and another showing the equipment ready for work. Then plan the steps that connect them.
Affiliate disclosure: This article contains affiliate links. If you purchase through these links, we may earn a commission at no extra cost to you.
Looking for ideas to organize limited space? Explore Ultimate Small Shop and compare its workshop planning approach with your garage’s everyday needs.
Agree on What the Garage Must Accommodate
Before moving equipment, list everything that needs regular access.
That may include the car, bicycles, recycling bins, household storage, a freezer, garden equipment and the door into the house.
Decide which activities need access during woodworking and which can wait until the session ends. If someone needs to retrieve a bicycle, the route should not pass through an active cutting area.
Agree on practical boundaries:
- When the vehicle can remain outside.
- When the garage must return to parking use.
- Which household items must remain accessible.
- Where unfinished projects may stay.
- Who checks that the garage is ready before parking.
These decisions shape the layout as much as the tools do.
For broader room planning, start with our garage woodworking shop guide. This article focuses on the daily changeover.
Separate Permanent Storage From Temporary Work Space
Divide the garage into three types of space.
Permanent storage holds tools and supplies while the vehicle is inside.
Temporary work space becomes available after the vehicle leaves.
Access space remains clear for doors, household movement and required equipment access.
A rolling cabinet stored beside the car belongs in permanent storage. The same cabinet may move into the temporary work space during a session. Its movement must not consume the access route.
Mark these areas on a measured sketch. Include vehicle door movement and the space people use while entering or unloading the car.
Floor tape can help you remember tested positions, but it does not establish adequate clearance by itself.
If space is especially tight, use the checks in our one-car garage workshop guide. With more room, compare the options in two-car garage workshop layouts.
Give Every Mobile Item a Parking Position
Mobile equipment saves effort only when you know where it goes.
Assign a specific storage position to each cart, machine, extractor and folding support. Label the positions if that helps everyone use the garage consistently.
A simple inventory might look like this:
| Item | Stored position | Working position |
|---|---|---|
| Mobile workbench | Along an available wall | In the cleared work area |
| Tool cart | Beside the storage cabinet | Near the current task |
| Dust extractor | Accessible storage position | Beside the connected tool |
| Folding supports | Secured wall storage | Positioned for the workpiece |
| Project tray | Dedicated shelf | On the assembly surface |
Check that each item can reach its position without moving several others.
Avoid creating a storage puzzle in which the extractor must move before the bench can move, but the bench blocks the extractor’s destination. A straightforward route makes short woodworking sessions much more practical.
Choose Mobility Without Sacrificing Stability
A cabinet on wheels and a machine on a suitable mobile base have different requirements.
Select bases and carts for the equipment’s weight, dimensions and intended use. Follow the relevant instructions for installation, movement and operating support.
Some mobile bases lower the equipment onto stationary feet for use. Others use different locking or support arrangements. Do not assume engaging a caster brake makes every machine adequately stable.
Before operating equipment, check that it is supported as required and does not rock or shift.
Also consider the floor. Cracks, slopes, thresholds and debris can make a heavy machine difficult to move. Avoid routine movement across these obstacles where possible.
Our guide to mobile bases and tool carts covers the choices in more detail.
Plan the Changeover Before Connecting Tools
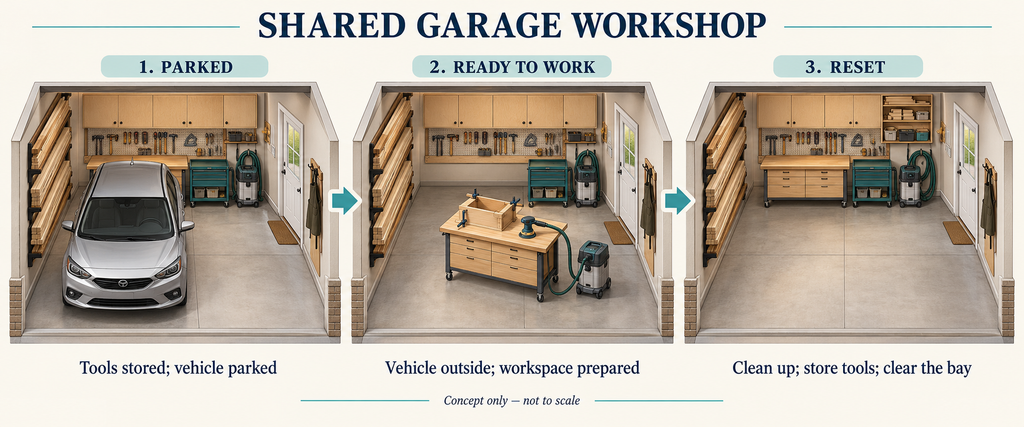
Use the same sequence each time you begin work.
1. Move the Vehicle Outside
Open the garage door fully before moving the vehicle. Do not idle a fuel-burning vehicle inside the garage, including while preparing the work area.
Once it is outside, shut it off and confirm that vehicle movement is finished before moving tools into the parking area.
2. Check the Floor and Access Routes
Look for water, loose objects and debris before rolling equipment into position.
Confirm that household access and exits remain available. Check overhead garage-door movement against tall equipment, stored boards and lighting.
3. Position the Equipment
Move the bench, tool cart and supports into their working locations. Establish stability according to their instructions.
Set out only what the session needs. Unfolding every table and moving every tool wastes space if you are doing one small task.
4. Connect Dust Collection and Power
Route hoses and cords after the equipment is positioned. Keep them away from exits, walking routes and workpiece movement.
Connect the tool only when its setup is ready for the intended operation.
5. Check the Actual Workpiece
Confirm that the board or assembly has sufficient support and movement space. Yesterday’s layout may not suit today’s longer material.
A familiar floor mark is a useful starting point, not a substitute for checking the job.
Want more ideas for arranging a compact work area? Review Ultimate Small Shop alongside your measured layout and tool requirements.
Keep Cords and Hoses Easy to Deploy
A shared workshop benefits from connections that are accessible and straightforward to put away.
Store hoses near the equipment they serve. Give power cords designated holders rather than dropping them into a crowded drawer.
Allow enough hose movement for the operation without leaving unnecessary loops across the floor. Keep connections accessible so they can be checked and disconnected without reaching behind unstable equipment.
If overhead routing is appropriate, plan its supports and clearances carefully. Do not hang hoses or cables from garage-door tracks or moving hardware.
Avoid storing connected tools in a way that strains plugs, sockets or dust ports. Follow the equipment instructions when disconnecting and moving it.
If the available storage footprint is very small, our portable and fold-away workshop guide explains alternatives to keeping every station assembled.
Give Unfinished Projects Their Own Storage
Tools are often easier to put away than the work they produce.
Before starting a project, decide where its parts, clamps and assemblies will stay when the vehicle returns.
Useful arrangements include:
- A labeled tray for small parts and hardware.
- A dedicated shelf for project components.
- A suitable rack for panels.
- A stable cart for assemblies that can be moved safely.
- Separate modules that can be assembled later.
Do not assume a freshly glued assembly can be moved immediately. Plan the glue-up location and curing time so the piece can remain properly supported without blocking parking or access.
Finishing also needs separate planning. Follow the finish label and safety data sheet for application, drying, ventilation and ignition precautions. Returning a vehicle to the garage may be incompatible with the finishing conditions required.
If a project cannot be stored safely between sessions, change the assembly sequence or arrange a longer period without parking.
End Work Before You Run Out of Cleanup Time
Choose a stopping point that leaves time to reset the garage.
For example, completing the current batch of parts may be a better stopping point than beginning another operation shortly before the car must return.
Use this reset sequence:
- Stop tools and let moving parts come to a complete stop.
- Disconnect or secure equipment as its instructions require.
- Label and store project parts.
- Put away cords, hoses and accessories.
- Remove dust and debris using appropriate cleanup methods.
- Return mobile equipment to its designated positions.
- Check vehicle clearance, door movement and household access.
- Bring the vehicle in only when the area is ready.
Avoid blowing dust around with compressed air as a shortcut. Cleanup should remove material rather than redistribute it.
Inspect the vehicle path for screws, nails and sharp offcuts. Also check for tools or materials projecting from shelves into the space needed by the vehicle or its doors.
Test the Routine With a Small Project
Run the complete changeover before relying on it for a larger build.
Time the setup and reset separately. There is no universal target; the useful question is whether the routine suits the length of your normal sessions.
Notice repeated frustrations:
| Problem | Possible adjustment |
|---|---|
| You move several items to reach one tool | Rearrange storage for direct access |
| Hoses repeatedly cross the walking route | Change equipment or connection positions |
| Parts occupy the workbench after every session | Add dedicated project storage |
| Folding equipment is awkward to lift | Reconsider its storage position or format |
| The car fits, but people cannot exit comfortably | Reassess the parking layout |
Change one problem at a time, then try the routine again.
A successful shared garage workshop makes both woodworking and parking predictable. Keep the storage positions clear, prepare only the tools you need, and leave enough time to restore the space after each session.
Ready to refine your setup? Explore Ultimate Small Shop for additional planning ideas you can evaluate against your own garage routine.