A woodworking shop needs enough space to operate its tools, support and move workpieces, assemble projects, and maintain clear access. The floor area occupied by your equipment is only part of the requirement.
There is no universal minimum room size that makes every woodworking setup practical. A person making small boxes with hand tools has different space needs from someone cutting large panels or milling long boards.
To decide whether a space is large enough, start with your projects and equipment. Then map the working areas they require—not just the places where they will be stored.
Affiliate disclosure: This article contains affiliate links. If you purchase through these links, we may earn a commission at no additional cost to you.
Planning a workshop in limited space? Explore the Ultimate Small Shop guide and compare its advertised planning guidance with your projects and available room.
Why Square Footage Alone Is Not Enough
Two rooms with the same floor area can behave very differently.
A long, narrow room may provide a useful path for some stock-feeding operations but make it difficult to turn wide panels. A more square room may offer better assembly space, depending on doors, obstacles, and equipment positions.
Consider these examples:
| Room dimensions | Approximate metric dimensions | Floor area |
|---|---|---|
| 10 × 12 feet | 3.05 × 3.66 metres | 120 square feet |
| 12 × 16 feet | 3.66 × 4.88 metres | 192 square feet |
| 12 × 20 feet | 3.66 × 6.10 metres | 240 square feet |
These are room dimensions, not recommended minimum workshop sizes.
None tells you whether a particular machine, material-handling task, or project will fit. You still need to account for the shape of the room, its access routes, and the work you intend to perform.
Our small workshop floor-plan examples explore how different room sizes affect arrangement choices.
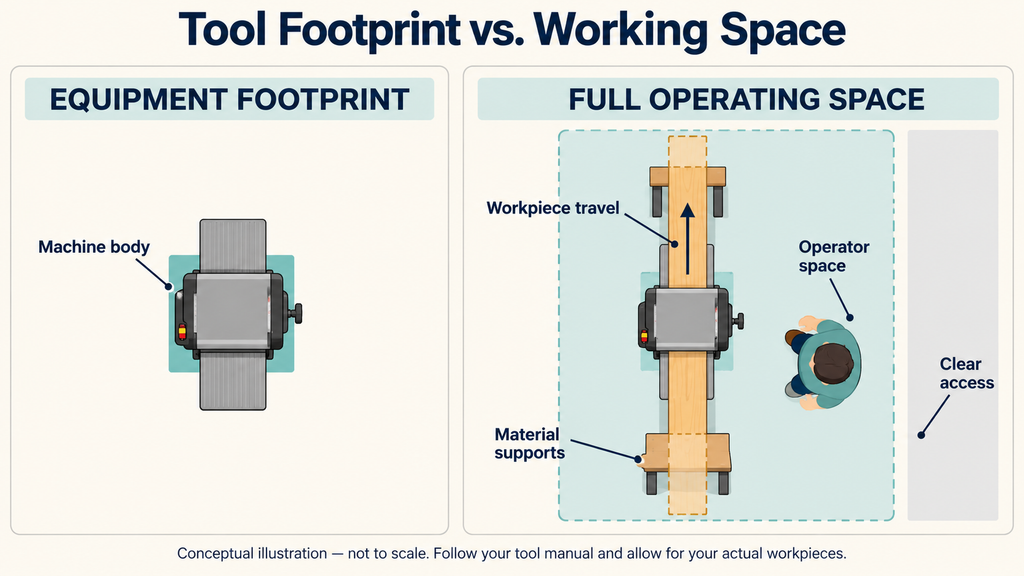
Understand the Three Types of Space
A useful workshop plan distinguishes between stored equipment, active work, and access.
1. Equipment Footprint
The footprint is the floor or bench area occupied by the equipment.
Include the installed configuration: stands, extension tables, projecting handles, attached cabinets, and other accessories can change the dimensions.
For movable equipment, record its parked footprint separately from its operating position.
2. Operating Space
Operating space includes the area needed for:
- The workpiece throughout the operation.
- The operator’s position and movement.
- Infeed and outfeed support where required.
- Fences, sliding tables, handles, and other moving parts.
- Dust hoses and connections.
- Loading and unloading material.
A small machine can require a much larger working area when processing a long board.
3. Access and Service Space
You also need access to doors, controls, power isolation, storage, and equipment requiring maintenance.
A machine may fit and operate in a particular position but still obstruct an access panel or prevent a door from opening properly.
Manufacturer clearance instructions are specific to the equipment. Use the manual for your exact model and installed accessories rather than transferring dimensions from a different machine.
Start With Your Largest Intended Workpiece
List the materials and projects you expect to handle.
Record more than their finished dimensions. A project that ends up small may start with long boards or large panels.
Ask:
- How will the material enter the workshop?
- Where will it be stored?
- Can it reach the tool without an awkward turn?
- Where will it move during the operation?
- How will the cut parts be supported?
- Where will the assembled project sit?
- Can the finished item leave the room?
Long Boards
A long board may need clear space on both sides of a machine during feeding. It also needs a practical route into position.
The fact that a board can be carried diagonally through a room does not establish that it can follow the required straight path through a tool.
Sheet Materials
A nominal 4 × 8-foot panel is roughly 1.22 × 2.44 metres. Handling it involves more than finding a place where it can lie flat.
Consider turning, lifting, supporting, and cutting it. If the room cannot accommodate the required handling arrangement, buying appropriately sized panels or arranging outside preparation may be more practical.
Completed Assemblies
A cabinet or table can occupy space for several sessions. Include room for clamps, access to joints, and any necessary drying or curing period.
Do not assume the assembly area becomes available immediately after you finish working for the day.
How Project Choice Changes Workshop Size
| Type of work | Space questions to resolve |
|---|---|
| Small hand-tool projects | Is the bench stable, accessible, and suitable for workholding? |
| Shelves and projects from prepared boards | Can the stock be supported, cut, and assembled without blocking access? |
| Plywood cabinets | Can panels enter, turn, be supported, and move through the cutting process? |
| Furniture from rough lumber | Is there space for preparation, milling, material storage, and assembly? |
| Larger finished pieces | Can the completed item be moved out through doors and corners? |
A small room may suit a deliberately limited project range. It does not need to support every branch of woodworking.
If compact hand-tool work interests you, explore our hand-tool workshop setup guide.
Measure Usable Space, Not Just the Room
Begin with a drawing of the room and its fixed features.
Record:
- Wall dimensions and ceiling height.
- Doors, stairs, and door swings.
- Windows and fixed shelving.
- Columns, low beams, and sloping ceilings.
- Electrical equipment and required access areas.
- Heating or other household equipment.
- Stored items that must remain.
- Routes shared with other people.
In a garage, include the vehicle’s actual position and the space needed to open its doors. In a basement, include the route from the stairs to the working area.
A Simple Area Calculation
Suppose a room measures 10 × 12 feet:
Gross area = 10 × 12 = 120 square feet.
A hypothetical bench measuring 2 × 5 feet occupies 10 square feet. A storage unit measuring 1 × 6 feet occupies another 6 square feet.
That leaves:
120 − 10 − 6 = 104 square feet of unoccupied floor.
However, that 104 square feet is not automatically usable operating space. Door swings, access routes, workpiece movement, and the shape of the remaining area still determine what you can do.
Subtracting footprints is a useful inventory exercise. It is not a clearance assessment.
Check the Full Movement of Each Operation
A static drawing can hide problems.
A sliding component changes position. A clamp projects beyond the bench. A board moves from mostly in front of a tool to mostly behind it. The operator may need to reposition or access a control.
For each major operation, examine the beginning, middle, and end.
For example, with a stock-feeding operation:
- Show the workpiece in its starting position.
- Show it partway through the operation.
- Show it at the end.
- Include supports and the operator’s required position.
- Check that controls and access routes remain usable.
Manufacturer site-planning guidance commonly asks users to consider the material being processed and auxiliary equipment alongside the machine itself. Any published minimum clearances must still be applied to the specific model they describe.
Our small woodworking shop layout guide explains how to bring these requirements into a room plan.
Want an additional resource for planning a compact workspace? Review the Ultimate Small Shop offer. Compare its layout guidance with your actual equipment manuals and material-handling needs.
Can Two Tools Share the Same Working Area?
Sometimes, if they are used separately and the arrangement provides the required space for each operation.
A movable tool might be parked against a wall and brought into a clear area when needed. A work surface may support different tasks at different times.
However, shared space requires planning.
Check that:
- The parked equipment does not obstruct the active operation.
- Supports can be positioned correctly.
- The equipment can be moved and secured appropriately.
- Hoses and cords can be managed.
- A partly completed project will not prevent the changeover.
- Required exits and access remain clear.
Mobile bases reduce the need for permanent operating positions. They do not reduce the space required while the equipment is in use.
Do Not Forget Assembly and Finishing
A room can fit the cutting equipment while leaving nowhere useful to assemble the project.
Draw the largest planned assembly at its actual dimensions. Add the space needed to position clamps, check alignment, and work around it.
Then consider where the assembly will remain between sessions.
Finishing introduces separate requirements involving product instructions, ventilation, dust, and ignition sources. An ordinary room or open corner is not automatically suitable for every finishing method.
If the workshop cannot accommodate the intended process, change the method or location rather than assuming the same work area will suit it.
Ceiling Height, Access and Floor Capacity Matter Too
Floor area is only one part of suitability.
Ceiling Height
Low beams and sloping ceilings can interfere with lifting or turning material. Check the path of long boards and the height required by equipment in its installed configuration.
Doorways and Stairs
Measure the entire route, including turns and landings. A wide room is of little help if the machine or finished project cannot reach or leave it.
Floor Capacity
Do not infer load capacity from floor area. Heavy equipment and concentrated storage loads may need assessment, particularly in sheds, upper floors, or buildings of uncertain construction.
For a wider comparison of locations, see choosing a space for a home woodworking workshop.
Test Your Plan Before Buying Larger Equipment
Make scale paper templates or mark proposed footprints with removable floor tape.
Include the working zones around them, using the equipment instructions and your intended workpiece dimensions.
A useful sequence is:
- Mark fixed obstacles and access routes.
- Position the bench and proposed equipment.
- Add stock movement and support areas.
- Add storage and assembly space.
- Review each intended operation separately.
- Check the workshop with a project left in progress.
Where possible, use lightweight cardboard representations to understand bulky workpieces. Do not handle heavy or awkward material alone simply to test a layout.
Any assessment around existing machinery should be done with the equipment switched off and isolated. A successful space rehearsal does not replace the manufacturer’s setup requirements.
Signs That the Space Is Too Small for the Planned Work
Reconsider the setup if:
- Workpieces cannot follow the required path.
- Doors or essential access routes become blocked.
- Controls are difficult to reach.
- Supports cannot be placed appropriately.
- You must stand in an unsuitable position to complete an operation.
- Assemblies leave no usable working area.
- Routine tasks require repeated awkward lifting.
- Equipment cannot be serviced without impractical rearrangement.
The solution may be a smaller project, prepared material, fewer machines, or a different workspace.
Avoid solving an operating-space problem by removing guards, omitting supports, or relying on an obstructed doorway.
Frequently Asked Questions
Is a 10 × 12-foot room big enough for woodworking?
It may suit some project types, but dimensions alone cannot establish suitability. Test the proposed equipment, materials, access, and assembly requirements within the room.
Is a one-car garage enough?
It depends on the garage dimensions, stored items, vehicle requirements, and woodworking activities. Plan both the parking arrangement and the working arrangement if the space is shared.
Do hand tools always need less room?
Some hand-tool setups can be compact, but they still need suitable workholding and room for the workpiece and operator. Long boards and large assemblies remain large regardless of the cutting method.
Can I use an open doorway for extra working space?
Only if the complete arrangement is suitable for the task, equipment, surroundings, and access requirements. Consider weather, level support, other people, and whether the doorway must remain available as an exit. Do not assume opening a door automatically resolves insufficient clearance.
Should I choose the room or the tools first?
Develop the choices together. Define your projects, assess the available space, and compare equipment that can operate appropriately within it.
Choose a Space That Supports the Work
The right workshop size is the size that accommodates your intended operations, materials, storage, and access requirements.
Measure the room, draw the equipment, and test the full workpiece movement. Include assembly and unfinished projects before deciding that everything fits.
Use our workshop planning checklist to record the measurements, then follow the small woodworking shop setup guide to develop the complete plan.
If you would like another planning resource, view the current Ultimate Small Shop offer and decide whether its contents address the space constraints you are working through.