Small woodworking shop floor plans help you decide where equipment belongs before you start moving heavy tools or building cabinets. But a useful plan must show more than furniture that fits inside a rectangle.
It also needs to account for wood moving through the shop, the operator using each tool, and projects waiting for assembly.
Below are three example arrangements for 10×12-foot, 12×16-foot, and 12×20-foot workshops. Each uses a different approach to balancing storage, work surfaces, and open floor space.
Affiliate disclosure: This article contains affiliate links. If you purchase through these links, we may earn a commission at no additional cost to you.
Planning your first workshop? Explore Ultimate Small Shop as an additional resource while comparing layouts.
Assumptions Behind These Example Floor Plans
All dimensions below refer to clear interior floor dimensions, measured inside the finished walls.
A shed advertised as 10×12 feet may have less usable space once wall framing and finishes are included.
These examples assume:
- One person working at a time.
- A rectangular room without columns or stairs.
- An entrance on the front, shorter wall.
- No vehicle or household equipment sharing the floor.
- Small furniture, shelves, boxes, and similar hobby projects.
- Equipment selected to suit the available room.
For orientation, “rear” means the wall opposite the entrance.
The suggested bench and cabinet dimensions are planning examples. They are not minimum safety clearances or a guarantee that particular machines will fit.
Use your equipment manuals to establish operating and maintenance requirements. Manufacturer guidance includes workpiece handling and auxiliary supports as well as the machine’s footprint.
If you have not yet assessed your space needs, start with how much room a woodworking shop requires.
Compare the Three Workshop Sizes
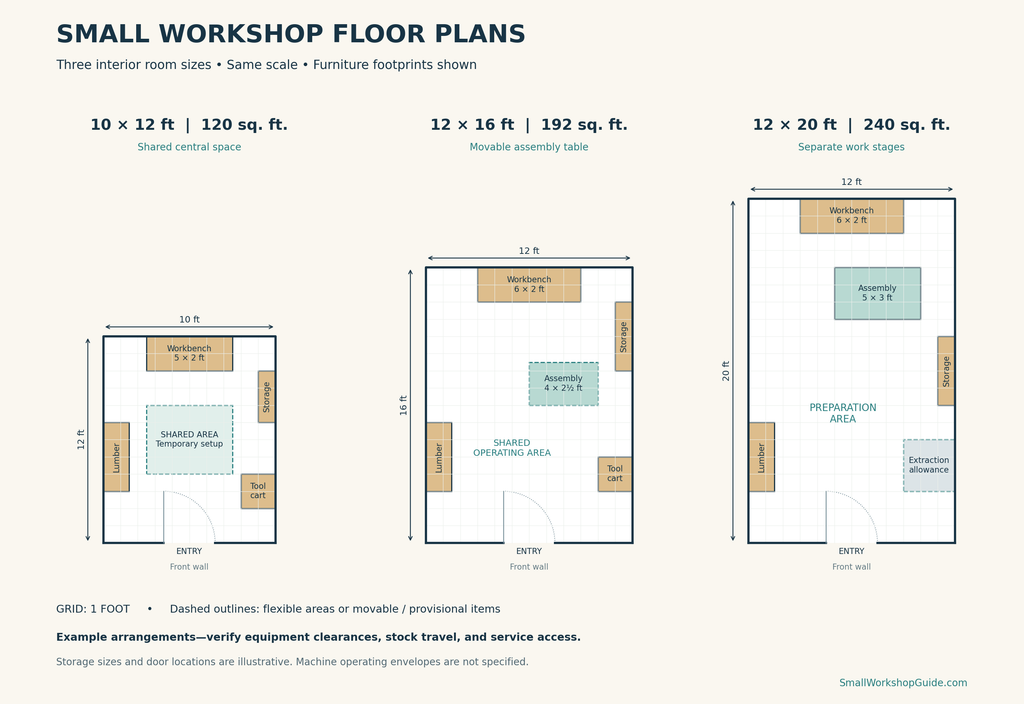
| Interior size | Floor area | Example approach | Main tradeoff |
|---|---|---|---|
| 10×12 feet | 120 sq. ft. | Wall bench and shared central work area | Frequent changes between operations |
| 12×16 feet | 192 sq. ft. | Wall bench, movable assembly table, selected compact tools | Tool operating areas still need careful coordination |
| 12×20 feet | 240 sq. ft. | Separate preparation and assembly areas | Long-stock handling can still constrain placement |
The larger room does not automatically need more equipment. Extra floor space can make the same tools easier to use.
Example 1: A 10×12 Workshop Floor Plan
A 10×12 shop can suit small projects when the equipment list is selective.
For this example, the room is 10 feet wide across the entrance wall and 12 feet deep.
The layout centers on a wall bench, shallow storage, and an open area used for one operation at a time.
Suggested arrangement
| Item | Example footprint | Position |
|---|---|---|
| Main workbench | 5 feet × 2 feet | Along the rear wall |
| Small-parts cabinet | 3 feet × 1 foot | Along the right wall, toward the rear |
| Portable-tool cart | 2 feet × 2 feet | Parked along the right wall, toward the front |
| Lumber storage | Sized to actual stock | Along the left wall, clear of the entrance |
| Temporary work surface | Selected for the task | Set up in the center when needed |
The bench handles marking, hand-tool work, and smaller assemblies. Portable tools stay stored until required.
Avoid assuming that a tool can operate safely in its parked position. A cart beside the wall may need to move before you use the tool it carries.
How work moves through the room
Bring manageable stock inside and place it in storage. Move selected pieces to the bench or temporary work surface, then return tools to storage before assembly.
For larger projects, consider having sheet goods cut into manageable pieces before bringing them into the room. Plan the cutting arrangement separately; the fact that a panel fits through the door does not mean it can be processed comfortably inside.
What this plan deliberately leaves out
This example does not reserve permanent stations for a table saw, jointer, planer, and miter saw.
Trying to include all four would require a substantially different equipment and operating-space assessment.
The main compromise is setup time. Cutting and assembly may use the same area at different stages.
Best fit: A beginner making smaller projects with hand tools and selected portable power tools.
Example 2: A 12×16 Workshop Floor Plan
A 12×16 room provides 72 additional square feet compared with a 10×12 room.
That space can support a more flexible arrangement, particularly if the assembly surface remains movable.
For this example, the room is 12 feet wide and 16 feet deep.
Suggested arrangement
| Item | Example footprint | Position |
|---|---|---|
| Main workbench | 6 feet × 2 feet | Along the rear wall |
| Movable assembly table | 4 feet × 2½ feet | Toward the center-right |
| Shallow storage | 4 feet × 1 foot | Along the right wall |
| Portable-tool cart | 2 feet × 2 feet | Parked against a side wall |
| Lumber storage | Sized to actual stock | Along the left wall near the entrance |
| Shared operating area | Determined by tools and stock | Through the front and central part of the room |
Keep the front portion flexible. It can provide space for handling incoming materials or positioning a portable tool with suitable supports.
Choose one main operating arrangement
If you want a compact table saw, draw its complete footprint and material path before committing to the central table position.
Orienting stock travel along the room’s 16-foot direction may be worth testing. However, a bench, door, or stored material at either end can reduce the usable path.
Do not assume that a 16-foot room automatically accommodates an 8-foot board through every machine. Tool geometry, operator position, support arrangements, and the full movement of the workpiece all matter.
For an alternative setup, use the central area for supported portable-tool work and retain more open assembly space.
Where this plan gains flexibility
The wall bench can hold measuring tools and a small workpiece while the movable table handles a separate assembly.
That reduces the need to clear the main bench between every task.
However, when a project remains clamped on the table, the table may no longer be easy to move. Test that occupied arrangement too.
Best fit: A mixed hand-tool and power-tool shop where selected machines share operating space.
Comparing a bench-focused shop with a more equipment-heavy setup? Take a look at Ultimate Small Shop while developing your equipment and space plan.
Example 3: A 12×20 Workshop Floor Plan
A 12×20 shop offers additional length for separating work stages.
For this example, the room is 12 feet wide and 20 feet deep. The width is unchanged from the previous layout, so side-to-side crowding still deserves attention.
Suggested arrangement
| Item | Example footprint | Position |
|---|---|---|
| Main workbench | 6 feet × 2 feet | Along the rear wall |
| Assembly table | 5 feet × 3 feet | Rear half of the room, offset to one side |
| Preparation area | Sized for selected equipment | Front half of the room |
| Lumber storage | Sized to actual stock | Near the front along a side wall |
| Tool storage | Shallow cabinets or drawers | Along available side-wall sections |
| Extraction equipment | Actual equipment dimensions | Positioned after checking connections and service access |
The main distinction is between preparation toward the front and assembly toward the rear.
This allows you to bring material inside without carrying it directly through an occupied assembly area.
Preserve the useful length
If a machine requires a straight stock path, draw that path before placing the assembly table.
One workable approach may be to offset the table and preserve a lengthwise operating lane. Another may require moving the table for certain operations.
The correct choice depends on the machine, the project, and the room’s openings.
Do not fill both long walls with deep stations simply because the room is longer. Every permanent projection reduces the remaining width.
Use the extra space for work in progress
A small staging shelf or cart can hold cut parts while the main assembly table remains occupied.
This is often more useful than adding another machine.
A cabinet waiting for glue to cure should not force you to stack parts on a saw or block access to the bench.
Best fit: A hobby shop needing more separation between material preparation, bench work, and assembly.
If the room shares space with vehicles or household storage, use our two-car garage workshop layout guide to account for those competing uses.
Adapt the Example to Your Actual Building
Even two rooms with identical dimensions can require different floor plans.
Check the entrance
The door position affects where you can store material and how you bring projects outside.
Draw the door swing and test the approach to it. Include the size of your assembled project, not just the boards used to build it.
Mark fixed obstacles
Windows, posts, heaters, electrical equipment, and low overhead areas may change where tools can operate.
Keep required access available. Do not treat every unoccupied corner as storage space.
Draw equipment at its complete size
Include fence rails, handles, stands, dust ports, and accessories.
For movable equipment, draw two positions: parked and operating.
Include the workpiece
Add the largest stock you expect to process and trace its movement through the operation.
Also account for the operator and any supports.
Check the building itself
A layout drawing does not establish whether a shed floor can support your equipment or whether the building is suitable for workshop use.
If you are adapting an outbuilding, read our shed woodworking workshop planning guide before choosing permanent installations.
Turn Your Chosen Arrangement Into a Scale Drawing
A convenient paper scale is ¼ inch equals 1 foot.
At that scale:
| Actual room | Rectangle on paper |
|---|---|
| 10×12 feet | 2½ × 3 inches |
| 12×16 feet | 3 × 4 inches |
| 12×20 feet | 3 × 5 inches |
Draw the walls and openings first. Then make movable paper cutouts for benches, storage, and equipment.
Use a separate outline or transparent overlay for operating areas. This keeps the distinction between “fits on the floor” and “can be used here” visible.
Our workshop layout templates guide explains how to build and revise this drawing.
Before installing anything permanently, mark the layout on the floor and walk through a typical project with tools switched off.
Frequently Asked Questions
Is a 10×12 shop large enough for woodworking?
It can be suitable for small projects and a selective tool collection. Project size, storage needs, and operating space matter more than floor area alone.
Can I put a table saw in a 12×16 shop?
Possibly, but the room dimensions alone cannot confirm that. Check the saw’s full dimensions, manual, stock travel, support needs, and surrounding obstacles.
Is a 12×20 shop big enough for every common woodworking machine?
Do not assume so. A collection of machines may physically fit while leaving inadequate space to operate them or assemble projects.
Should the assembly table be in the middle?
Only if that position supports your workflow. An offset or movable table may preserve a more useful material path.
Choose the Plan That Supports Your Projects
Use these examples as starting arrangements.
The 10×12 plan emphasizes shared space. The 12×16 plan adds flexibility. The 12×20 plan provides more opportunity to separate preparation and assembly.
Next, apply the workflow checks in our small woodworking shop layout guide and test your preferred arrangement using real measurements.
Ready to develop your workshop plan further? Explore Ultimate Small Shop here.