The best table saw placement in a small shop depends on the material you cut, the saw’s complete dimensions, and the space needed to operate it. Start by drawing the workpiece’s path through the saw, then position nearby benches and storage around that path.
A saw that fits neatly against a wall may be difficult to use there. A saw placed in the middle of the room may interrupt assembly or block access to storage.
The goal is to find a position that supports your actual projects while preserving access, material support, and clear exits.
Affiliate disclosure: This article contains affiliate links. If you purchase through these links, we may earn a commission at no additional cost to you.
Planning your overall workshop arrangement? Explore Ultimate Small Shop as an additional planning resource.
Begin With the Manual for Your Saw
Use the manual for your exact model before committing to a location.
Check the requirements for installation, support, electrical supply, dust extraction, guards, accessories, and operation. Include the instructions for any stand, mobile base, or outfeed attachment you intend to use.
This article focuses on room planning. The saw’s manual and appropriate instruction remain essential for learning how to perform individual cuts.
Record these details:
| Item | What to include |
|---|---|
| Complete footprint | Cabinet or stand, tabletop, wings, rails, and projections |
| Fence movement | Space occupied throughout its intended travel |
| Controls | Access to the switch, adjustments, and disconnect |
| Accessories | Outfeed support, sliding attachments, or other approved equipment |
| Dust connection | Port position and the space needed for the hose |
| Maintenance | Access to panels and parts identified in the manual |
Do not substitute the tabletop dimensions for the complete machine footprint.
For the broader room-planning method, see our small woodworking shop layout guide.
Understand the Four Areas Around the Saw
Table saw placement becomes easier to assess when you distinguish four overlapping needs.
1. The equipment footprint
This is the space occupied by the saw and its installed accessories.
Fence rails may extend beyond the cabinet. A motor, hose connection, or mobile-base pedal may project into an area that looks empty on a simplified drawing.
2. The workpiece path
This is the space occupied by the material throughout the operation.
It includes the starting position, travel through the cutting area, and finishing position. The path changes with workpiece size and the type of operation.
3. The operator’s working area
Allow room for the stance, movement, and workholding method described in the manual.
The operator should not have to stand against a wall, step over a hose, or squeeze between furniture to complete the intended operation.
4. Access and circulation
Keep access to controls, service points, and exits available.
A gap that allows someone to walk past a stored saw may be unsuitable as a passage while cutting is underway.
How Much Space Does a Table Saw Need?
There is no single room-size or clearance figure that works for every saw and project.
A compact saw used for small parts has different space demands from the same saw processing long boards or broad panels.
Use stock length as an initial planning check
For a straight rip cut on an 8-foot board, the board occupies roughly 8 feet ahead of the cutting area before feeding and roughly 8 feet beyond it after passing through.
That illustrates why long stock requires substantial lengthwise space. It does not establish a complete minimum room dimension. The saw’s geometry, the operator, supports, and access still need consideration.
Measure from the cutting area when tracing the stock’s travel, rather than simply adding an arbitrary gap behind the cabinet.
Check width as carefully as length
A long, narrow board and a wide panel create different handling problems.
Include the full panel width, fence position, and supporting equipment. Check whether the material will strike a wall, cabinet, adjacent machine, or stored project.
If you cannot support and control the material appropriately, change the cutting arrangement before starting.
Draw the Material Path Before Positioning Furniture
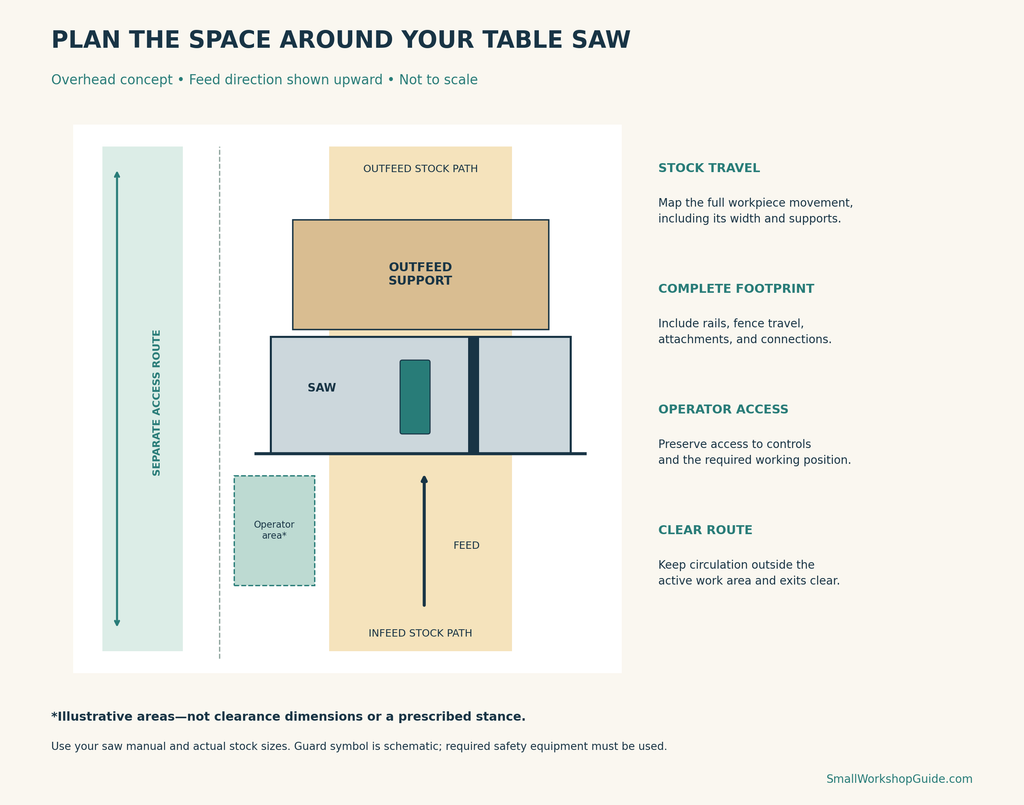
On a scale drawing, mark the saw’s cutting area and normal feed direction.
Then draw the largest workpiece you regularly intend to process in its starting and finishing positions. Include intermediate positions where a corner or edge could hit an obstacle.
Add the support arrangement and operator’s working area.
This combined outline is sometimes called an operating envelope: the space the setup needs while being used.
Check for conflicts with:
- Door swings and entrances.
- Workbenches and assembly tables.
- Cabinet doors and open drawers.
- Lumber racks.
- Posts or fixed equipment.
- Hoses and cords.
- Other people’s routes through the room.
Plan the arrangement around frequent tasks. An occasional unusually large project may require a different preparation method.
Compare Three Placement Options
| Placement | Potential benefit | Main issue to check |
|---|---|---|
| Central or near-central | Access around the saw and flexible stock handling | Can divide the room and compete with assembly |
| Offset toward one side | May preserve a more useful open area elsewhere | Fence travel, panel width, and service access |
| Mobile operating position | Allows the saw to share space with other activities | Repeated setup, stability, and support alignment |
Central placement
A central position can work when the saw is a major part of your workflow.
However, the middle of the room is also valuable for assembly and material handling. Check whether the saw leaves useful space on either side or creates narrow, awkward passages.
Offset placement
Moving the saw away from the center may preserve a larger continuous work area.
Do not push it toward a wall based only on the cabinet width. Check the complete fence arrangement, stock movement, controls, and maintenance needs.
Mobile placement
A compatible mobile base or portable stand can allow separate stored and working positions.
Draw both positions. Confirm that the saw can move between them without shifting a nearly finished project or blocking the entrance.
Mobility helps you reuse space; it does not reduce the operating space required for a cut.
Orient the Saw Around the Useful Length of the Room
Feeding stock along the longer room dimension is often worth testing first.
But usable length matters more than wall-to-wall length. A bench at one end and a cabinet at the other may leave a shorter clear path than expected.
A diagonal arrangement can sometimes avoid an obstacle, but it may also create cramped corners and awkward approaches. Test the entire workpiece movement rather than relying on the room’s diagonal measurement alone.
Consider where material comes from and where completed parts go. Our woodworking shop workflow guide explains how saw placement fits into the broader project sequence.
Plan Supports as Part of the Saw Setup
Include infeed, outfeed, and side support where the operation requires them.
Support equipment must suit the task and be positioned according to the relevant instructions. A convenient table behind the saw is not automatically suitable outfeed support.
Check that:
- The support is stable and correctly adjusted.
- The workpiece will not catch on an edge.
- Accessories can travel without striking it.
- It does not obstruct controls or access.
- It remains available for the intended cut.
For a fuller discussion, see our small-shop infeed and outfeed support guide.
Can an assembly table also provide outfeed support?
Potentially, if its construction, height, position, and compatibility suit the saw and operation.
The practical limitation is availability. A table covered with clamps or a glue-up cannot perform both jobs at once.
Include that occupied condition when evaluating the layout.
Comparing fixed and movable workshop arrangements? Take a look at Ultimate Small Shop while developing your overall space plan.
Preserve Operator Access and Keep Others Clear
The layout must allow you to use the saw’s required guards and safety equipment without obstruction.
OSHA’s table saw guidance highlights guarding and positioning to the side of the blade’s line to reduce kickback injury exposure. That does not make any particular standing position risk-free or replace the operating instructions for your saw.
Avoid placing the saw where someone entering the room is likely to walk directly into the active work area.
Keep the switch accessible throughout the intended operation. Do not arrange stock or supports so they hide controls or force you to reach across the cutting area.
A shared garage may need a clear agreement that other people stay outside the working area while the saw is running.
Include Hoses, Cords, and Lighting
Check the actual connections in the operating position.
A dust hose may bend differently after the saw is moved. A cord that is tidy when the saw is stored may cross the operator’s path during use.
Route connections to avoid interference with feet, stock, and moving accessories. Follow the equipment instructions for electrical supply and extraction.
Also assess lighting from the working position. Your body, an overhead cabinet, or a large panel can create shadows that are not obvious from the doorway.
Be Careful About Relying on an Open Door
An open garage door may appear to provide additional stock-handling space.
Before relying on it, consider the surface outside, changes in level, weather, public access, and the stability of any supports. Keep required exit access available.
An opening alone does not establish a suitable cutting arrangement. If the operation cannot be set up appropriately, reduce the material elsewhere using a suitable method or reconsider the equipment choice.
Our table saw versus track saw comparison discusses how the tools differ for small-shop work.
Test the Layout Before Making Permanent Changes
Use floor tape to mark the saw, supports, and surrounding furniture.
With the saw disconnected and the blade lowered as directed by the manual, check the proposed arrangement without performing a powered cut. Lightweight mockups can help assess material movement without awkwardly handling heavy stock.
Confirm that you can:
- Bring the material to the starting position.
- Position the required supports.
- Access controls and adjustments.
- Complete the intended stock movement without collisions.
- Retrieve parts without entering an obstructed area.
- Keep the exit and necessary access routes clear.
If a check fails, revise the layout before using the saw.
For a mobile setup, repeat the relevant checks after repositioning. Supports and connections may not return to exactly the same place.
Frequently Asked Questions
Should a table saw go in the center of a small shop?
Only if that position suits the material path and leaves useful space for other work. An offset position may work better in some rooms.
Can I store a table saw against a wall?
Possibly, if the equipment and storage arrangement allow it. A suitable storage position may still require moving the saw before operation.
Does a small jobsite saw need less working space?
Its equipment footprint may be smaller. Long boards and large panels still require room for handling and support.
Can I use the area behind the saw for storage?
Only where stored items remain outside the required stock path, support arrangement, and access space. Check the operating setup, not just the parked machine.
Position the Saw Around the Complete Operation
Good table saw placement accounts for the machine, the material, the operator, and the supporting equipment.
Start with the manual, map your regular cuts, and test the proposed position before installing permanent furniture nearby. If the operation does not fit, change the arrangement or cutting method.
Ready to develop the rest of your workshop layout? Explore Ultimate Small Shop here.