Router tables and drill presses can fit into relatively small footprints, but their working space extends beyond the equipment itself.
A router table needs room for material to travel through the intended operation. A drill press needs space to position and secure the workpiece, operate the feed handle, and adjust the table.
Start with the projects you build and the instructions for your equipment. Then map the working area before placing either machine beside a wall, bench, or storage cabinet.
Affiliate disclosure: This article contains affiliate links. If you purchase through these links, we may earn a commission at no additional cost to you.
Planning these stations alongside your other tools? Explore Ultimate Small Shop as an additional planning resource.
Plan Around the Workpiece, Not Just the Machine
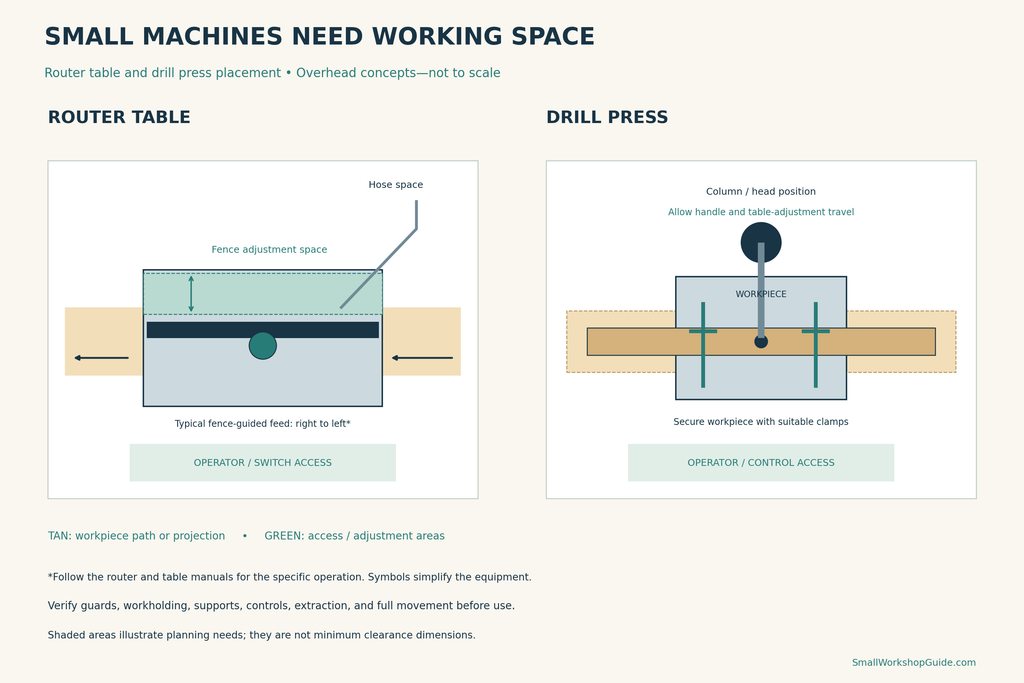
A compact machine does not necessarily need a compact operating area.
A router table used for short components may fit comfortably in one position. Routing a long rail at the same table can require much more lateral space.
Similarly, a drill press may handle a small block within its table area while a shelf or cabinet side extends far beyond it.
| Planning need | Router table | Drill press |
|---|---|---|
| Material space | Travel through the intended routing operation | Positioning and support around the drilling point |
| Operator access | Controls, workholding, and feed movement | Switch, feed handle, clamps, and table adjustments |
| Equipment movement | Fence, guards, lift, and accessories | Table height, rotation or tilt, and feed handles |
| Connections | Router power and dust extraction | Power and any task-specific extraction |
| Service access | Router, insert plate, and adjustment mechanisms | Chuck, head cover, drive components, and table mechanism |
Include these areas in the broader small woodworking shop layout.
Router Table Placement: Map the Intended Operation
Begin with the router table’s complete dimensions.
Include the stand, fence, adjustment handles, guards, switch, and dust connections. If the router is enclosed beneath the top, allow access to that enclosure.
Then map the material’s starting position, movement, and finishing position.
Leave room at both ends of the workpiece path
For common fence-guided edge routing, material travels across the front of the fence. The Bosch RA1181 instructions specify right-to-left feeding for its standard arrangements.
Follow your own equipment instructions and the correct procedure for the operation. Do not reverse the feed direction simply because one side of the room is obstructed.
A cabinet beside the table may interfere with the workpiece before it reaches the cutter or after it passes.
Check the full path at the actual working height.
Account for wide components and jigs
Long stock is only one consideration.
Wide panels, coping sleds, featherboards, and other accessories can extend beyond the table or occupy space normally used by the operator.
Draw these components in their operating positions. Check that they do not block the switch, interfere with guards, or strike adjacent equipment.
Can a Router Table Go Against a Wall?
A position near a wall may work if it preserves the required adjustments, connections, and material movement.
Check:
- Full fence travel.
- Dust-port and hose space.
- Access to the router and height adjustment.
- Opening of cabinet doors.
- Guard and accessory clearance.
- The workpiece path at both ends.
The rear edge of the tabletop is not necessarily the rear edge of the operating setup.
Avoid trapping adjustment controls
Some adjustments are made above the table; others require access beneath it.
Do not position the station so a routine adjustment requires moving a heavy cabinet or reaching through an awkward gap.
Disconnect the router as instructed before adjustments, bit changes, or maintenance.
If you are still choosing between handheld and table-mounted routing, see our router versus router table guide.
Give a Benchtop Router Table a Suitable Base
A benchtop router table needs a stable supporting surface and the securing method specified by its manufacturer.
Include the support bench or stand in your space calculations.
Placing a small table on a deep workbench can create several problems:
- The combined working height may be unsuitable.
- You may have to reach too far toward the work.
- The bench may block access underneath.
- Connections may cross your standing area.
- The setup may occupy the only assembly surface.
Assess the complete arrangement, including how you install and remove the table if the bench serves other tasks.
Drill Press Placement: Check the Actual Drilling Point
A drill press holds the cutting tool in a fixed relationship to its column, but your workpiece may need several different positions.
Start with a representative project part. Identify where each hole will be drilled and how the part must be positioned to reach it.
A panel that fits comfortably for a hole near one edge may need much more room when turned for another hole.
Check the machine’s capacity first
Clear room around the drill press cannot overcome the distance between the spindle and column or other machine limits.
Confirm that the equipment can accommodate the intended workpiece, bit, workholding, and drilling depth before rearranging the shop around it.
Allow room for long stock
A long rail may extend to either side of the table.
Plan suitable support where needed, without obstructing clamps or the operator’s position. Do not rely on holding an awkward workpiece by hand because the surrounding space prevents proper workholding.
Preserve Space for Clamps and Vises
Workholding should be part of the drill press layout from the start.
CCOHS guidance calls for a clamp or drill vise to prevent the workpiece from spinning and for the start/stop control to remain within easy reach.
Allow room to install and operate the appropriate workholding equipment. Secure the workpiece and any vise or fixture as required by the machine and accessory instructions.
Check:
- Clearance for clamp handles.
- Access beneath the table where needed.
- Space for a suitable backing board.
- Clearance between the bit path and clamps.
- Access to the feed handle and switch.
- Support for projecting material.
A large auxiliary table may improve support for some tasks while reducing access to the original table’s controls. Evaluate both effects before installing one.
Leave Room for Drill Press Adjustments
A drill press needs access beyond its working table.
Depending on the model, you may need to raise, lower, rotate, or tilt the table. The crank and locking handles require clearance throughout those movements.
Also check the feed handle’s full sweep.
Include overhead access
Some machines require opening a head cover to change belt positions or perform maintenance.
A shelf above the drill press can prevent that cover from opening even when the machine itself fits underneath it.
Follow the manual’s requirements for adjustments and service. Do not assume that a narrow storage position is also a workable operating position.
Is a Corner Suitable for a Drill Press?
A corner can accommodate the machine’s base while restricting the material you can drill.
It may work for small parts, but long or wide pieces can strike either wall as you position them.
Before choosing a corner, test:
- Your largest typical workpiece.
- Several intended hole locations.
- The workholding arrangement.
- Table and handle movement.
- Access for maintenance.
If the corner works only for one small component, decide whether that limitation suits your projects.
Compare Benchtop and Floor-Standing Arrangements
| Arrangement | Potential benefit | Main limitation |
|---|---|---|
| Benchtop machine on a dedicated stand | Compact station with purpose-chosen support | Stand still requires floor space |
| Benchtop machine on a shared bench | Reuses an existing surface | Competes with assembly and may need frequent setup |
| Floor-standing drill press | Dedicated support and access | Permanent footprint and installation requirements |
| Router table in a compatible combined station | Can reduce duplicated furniture | One function may obstruct another |
A benchtop tool is not automatically easy to store or lift. Consider weight, handling, mounting, and working height.
For a broader comparison, read our benchtop versus floor-standing tools guide.
Comparing dedicated stations with shared work surfaces? Take a look at Ultimate Small Shop while developing your workshop plan.
Coordinate the Stations With Your Workbench
Router tables and drill presses often serve parts that also return to the workbench for marking, fitting, or assembly.
A manageable transfer between stations can be useful, but placing everything close together can create overlapping workpiece paths.
Check the bench with a project on it. An empty tabletop may sit below passing stock, while a clamped cabinet above it blocks the operation.
Allow somewhere to stage completed parts without covering the next machine you need.
Our workbench placement guide explains how to assess the occupied bench.
Route Connections Around the Working Area
Plan cords and hoses in the operating arrangement.
For a router table, check the hose throughout fence adjustment and any cabinet access. Keep it clear of the intended material movement.
For either machine, avoid placing connections where they interfere with feet, workholding, controls, or moving components.
Preserve access to the required means of disconnecting power.
Also check lighting from the normal working position. The machine head, fence, or workpiece may cast shadows over a marked line or drilling point.
Be Careful With Shared Operating Space
Two stations may use the same open area at different times, provided the inactive equipment does not obstruct the active operation.
Draw each setup separately.
For example, a router table may use a lateral stock path that passes through an area otherwise used for drill press access. That arrangement needs reassessment whenever equipment, supports, or projects occupy the shared space.
Do not assume overlapping areas are suitable for simultaneous use.
For movable equipment, use a manufacturer-compatible arrangement and follow its stability requirements. Tall equipment deserves particular care; casters alone do not establish a suitable mobile setup.
Test the Layout Before Installing Storage
Mark the complete station footprints on the floor.
With equipment disconnected and following the manuals, check representative workpieces, accessories, and adjustments without running the tools.
For the router table, verify:
- Material travel through the intended operation.
- Fence and guard movement.
- Workholding and accessory clearance.
- Access to controls and the router.
- Hose and cord routing.
For the drill press, verify:
- Workpiece positioning for intended holes.
- Clamp or vise installation.
- Table adjustment and feed-handle travel.
- Access to the switch.
- Head-cover and maintenance clearance.
Revise any layout that requires awkward reaching, unsuitable workholding, or blocked access.
Frequently Asked Questions
Can a router table sit against a wall?
Potentially, if fence travel, extraction, adjustments, and material movement remain clear. Check the complete setup.
Does a drill press need space on both sides?
It depends on the workpieces and operations. Check the positions needed to reach each drilling location, including clamps and supports.
Can both machines share one bench?
Possibly, if the bench provides suitable stability, mounting, height, and operating space. Test each machine with the other equipment in place.
Is a corner the best location for a drill press?
Only if it accommodates your typical workpieces and machine adjustments. A corner can restrict large or long material.
Should these machines be close to the workbench?
Convenient access helps, but clear workpiece movement and proper workholding are more important than proximity.
Place Small Machines Around Real Tasks
Router tables and drill presses deserve the same layout attention as larger machines.
Map material movement, provide stable support, preserve adjustment access, and include workholding from the beginning. A well-chosen position makes the station useful for the projects you actually build.
Ready to develop your broader workshop arrangement? Explore Ultimate Small Shop here.