The best workshop upgrade solves a problem you have encountered while building. Before buying another tool, identify what limits your work, check whether maintenance or a simpler improvement would help, and calculate the complete cost of the proposed change.
An upgrade might be a better clamp, more suitable work support, improved lighting, or a different storage arrangement. A larger machine becomes worthwhile when its capabilities match a recurring need and the workshop can accommodate it.
This guide explains how to improve a small woodworking shop in stages while reducing unnecessary replacement purchases.
Affiliate disclosure: This article contains affiliate links. If you purchase through these links, we may earn a commission at no additional cost to you.
Reviewing your workshop’s next stage? Explore the Ultimate Small Shop guide and compare its planning approach with the problems you want to solve.
Start With a Problem, Not a Product
A product description explains what equipment can do. Your workshop experience tells you whether you need that capability.
Write the problem in a sentence before researching purchases.
Useful examples include:
- “I cannot support the longer boards used in my current projects.”
- “Assembly occupies my only work surface for several days.”
- “I repeatedly stop to retrieve tools stored across the room.”
- “My current method cannot produce the parts required by the next project.”
- “The existing tool no longer performs correctly after the checks specified in its manual.”
These statements give you something to investigate.
“I want a better workshop” is too broad to guide a purchase. “I need a suitable assembly surface that leaves my bench available” is specific enough to compare solutions.
Keep a Short Workshop Problem Log
Record difficulties as they happen. Separate occasional inconvenience from a recurring limitation.
| Problem | When it occurs | Effect on the work | What to investigate first |
|---|---|---|---|
| Workpiece lacks adequate support | Working with longer stock | Operation cannot proceed appropriately | Suitable supports and available space |
| Bench remains occupied | Glue-ups and unfinished assemblies | Other tasks are delayed | Separate holding or assembly area |
| Cuts have become inconsistent | Repeated operations | Rework and wasted material | Setup, cutter condition, technique, and maintenance |
| Tool retrieval interrupts work | Most sessions | Unnecessary walking and searching | Storage location |
| Required capacity is unavailable | A new project type | Current equipment cannot perform the task | Alternative method, outside service, or equipment upgrade |
Resolve conditions affecting suitable operation before treating them as productivity problems. If an operation lacks the required support or safeguards, postpone it until the issue is addressed.
For ordinary inefficiencies, the log helps you decide which change deserves attention first.
Use Three Stages for Workshop Development
Stages are more useful than a rigid shopping schedule. Progress when your projects justify the next change.
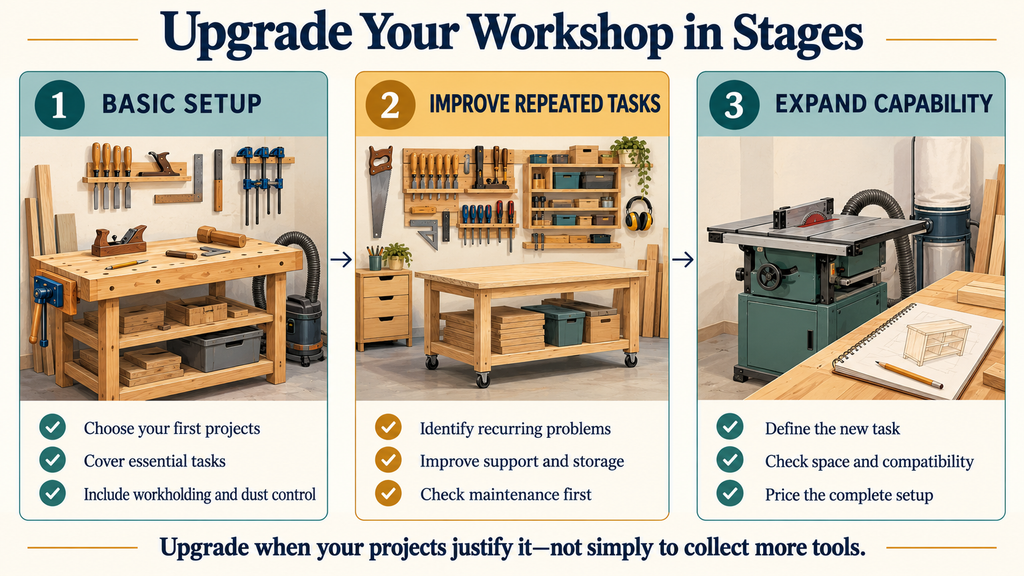
| Stage | Main purpose | Typical improvements | Evidence that you are ready to move on |
|---|---|---|---|
| 1. Complete initial projects | Establish a usable basic setup | Essential tools, workholding, supports, appropriate dust control | You can complete the intended beginner work |
| 2. Improve recurring tasks | Reduce repeated difficulties | Better storage, assembly space, suitable accessories, improved task lighting | The same limitations recur across projects |
| 3. Expand capability | Support a different scale or type of work | Larger-capacity tools, specialist equipment, supporting infrastructure | You have defined projects requiring the additional capability |
The stages can overlap. A change in project type may introduce a new requirement before you have perfected every storage detail.
The purpose is to connect spending to actual work.
Stage 1: Build a Complete Basic Setup
At the beginning, focus on completing a manageable range of projects with suitable equipment.
Avoid buying a broad collection while leaving essential supporting items unresolved.
A basic setup needs appropriate ways to:
- Measure and mark.
- Cut or otherwise prepare the selected material.
- Hold and support workpieces.
- Drill and assemble where required.
- Prepare surfaces.
- Manage dust and task-specific hazards.
- Store tools and unfinished work.
The exact tools depend on your chosen projects.
Our essential woodworking tools guide helps you identify those capabilities. If you are still deciding where to spend first, use the budget workshop guide.
Avoid the “Temporary” Purchase With No Clear Role
A low-cost tool may be a sensible starting choice if it meets your current requirements. However, buying something you already know cannot perform the intended work can create an unnecessary replacement expense.
Before purchasing, distinguish between:
Limited but suitable: The tool meets a defined initial need.
Unsuitable from the start: The tool lacks the capacity, compatibility, or supporting features required for the project.
A modest tool can remain useful for years when its role is clear.
Stage 2: Improve the Tasks You Repeat
After completing projects, you have better evidence about how the workshop functions.
This stage often involves supporting equipment rather than major machines.
Improve Workholding and Material Support
If you repeatedly struggle to position parts or support stock, investigate suitable clamps, bench accessories, or supports.
Check compatibility, stability, and the intended use. More clamps are helpful only when their type and capacity suit the work.
Improve Storage Where It Interrupts Work
Move frequently used items closer to the operations they support, provided the new location does not obstruct movement or access.
You may not need additional storage capacity. You may need a more useful arrangement of existing storage.
Separate Assembly From Other Tasks
If a project occupies the only bench between sessions, consider a suitable assembly or holding area.
A new table should solve that conflict without creating another one in the remaining floor space.
Review Lighting at the Work Surface
Evaluate visibility while standing in your normal working position. A change in fixture position or task lighting may address shadows more effectively than simply increasing the number of lights.
Improve Repeatability
Suitable stops, guides, or manufacturer-approved accessories may help with recurring operations. Confirm that the accessory is appropriate for the exact equipment and does not interfere with its safeguards.
Grizzly’s guidance, for example, distinguishes compatible accessories intended for its machines from modifications beyond their intended design. For any brand, check the relevant manufacturer’s instructions before making changes.
Stage 3: Add Capability When Projects Require It
A larger or more specialized tool is easier to justify when you can identify the work it enables.
Examples of a genuine capability change include:
- Moving from prepared boards to processing rough lumber.
- Taking on workpieces beyond the current tool’s capacity.
- Performing a recurring operation that the existing setup cannot do appropriately.
- Building larger projects that require different support and assembly arrangements.
Before buying, consider alternatives.
Could you purchase prepared material, use a suitable outside service, or choose a different construction method? These options may be useful while you establish how often the new capability will be needed.
If the demand is frequent and the complete setup fits your space and budget, ownership may make more sense.
Planning a larger change to your workshop? Review the Ultimate Small Shop offer as an additional planning resource. Check its contents against your goals, and verify requirements for the equipment you actually intend to install.
Check Maintenance Before Replacing a Tool
Poor performance does not automatically mean the tool needs upgrading.
Depending on the equipment, the cause could involve wear, an unsuitable accessory, incorrect setup, or maintenance that is due.
Follow the manufacturer’s inspection and maintenance instructions. Isolate equipment as directed before servicing, and use qualified help for work beyond your competence.
Do not compensate for a fault by changing your working position, removing a safeguard, or forcing the equipment through the task.
Our woodworking tool maintenance checklist helps organize routine checks and records.
Repair, Add an Accessory, or Replace?
Compare the options against the problem you identified.
| Option | When it may fit | What to check |
|---|---|---|
| Maintenance or adjustment | Performance has deteriorated within an otherwise suitable setup | Manual procedures, wear, service requirements |
| Repair | A repairable fault prevents an otherwise useful tool from functioning | Diagnosis, parts availability, repair cost, expected condition afterward |
| Compatible accessory | The tool is suitable but needs support for a particular operation | Exact compatibility, intended use, complete installed cost |
| Outside service or rental | The requirement is occasional | Availability, transport, suitability, total cost |
| Replacement | Capacity is insufficient or repair is not a sensible option | Whole setup cost, space, supporting equipment, future use |
There is no universal repair-cost percentage that decides the answer.
A relatively inexpensive repair may be poor value if essential parts are unavailable or other serious issues remain. A more substantial repair may be reasonable for equipment that remains well suited to the work.
If considering a used replacement, follow our used woodworking tool inspection checklist.
Calculate the Cost of the Whole Upgrade
A machine purchase can trigger several other expenses.
Include:
- Required blades, bits, or other accessories.
- Appropriate stands, mounts, or mobile bases.
- Workpiece supports.
- Extraction changes.
- Professionally assessed electrical work where necessary.
- Delivery and handling.
- Space changes.
- Initial servicing for used equipment.
Do not assume an existing accessory or extractor will suit a new machine because the connection looks similar.
Use our workshop setup cost guide to compare complete options.
Account for the Existing Tool Separately
If you expect to sell the old tool, distinguish between the upgrade’s purchase cost and the possible sale proceeds.
Do not rely on an optimistic resale figure to make a purchase affordable. Keep the upgrade decision workable if the sale takes longer or produces less than expected.
An existing tool may also retain a useful role. Keep it because it serves that role—not simply because there is an empty corner available.
Plan Compatibility Without Buying Far Ahead
Thinking ahead can reduce duplication, but speculative purchases can tie up money and space.
Useful checks include:
- Whether a proposed cordless tool works with batteries you already own.
- Whether accessories are intended for the exact model.
- Whether storage can accommodate the likely replacement size.
- Whether a mobile base supports the equipment as specified.
- Whether extraction and electrical provisions suit the new requirements.
Leave flexibility where the future choice is uncertain.
For example, adjustable storage may be more useful than building a fixed compartment around a tool you have not selected.
Use our guide to woodworking tool buying order to keep future possibilities separate from current requirements.
Example: Improving a Workshop Without Adding a Machine
Consider a hobby woodworker making small shelves and boxes.
The cutting and drilling equipment meets the project requirements, but each assembly occupies the main bench. The owner frequently clears parts away to start another operation.
The problem is bench availability.
Possible options include:
- Change the project sequence so incompatible tasks do not overlap.
- Create a suitable location for work in progress.
- Add a compact assembly surface if the room can accommodate it.
Buying a larger saw would not solve this particular limitation.
After testing a new assembly arrangement, the owner can assess whether bench access has improved before spending on another change.
Measure Whether the Upgrade Helped
Record the intended result before making the change.
Examples include:
- “Complete this operation without moving unrelated storage.”
- “Keep the main bench available while an assembly remains clamped.”
- “Handle the planned stock with suitable support.”
- “Reduce repeated setup steps.”
- “Perform the new project operation within the equipment’s intended capability.”
After using the revised setup, compare the result with that statement.
If the problem remains, investigate why. Buying the next accessory without reviewing the first change can turn one unresolved issue into several purchases.
Frequently Asked Questions
What is the best first workshop upgrade?
The improvement that addresses your most important unresolved need. That might be workholding, support, lighting, storage, maintenance, or a new tool. Diagnose the problem first.
Should beginners buy professional equipment immediately?
Compare the equipment with the work, space, and budget available. Higher capacity or additional features are useful when you need them; they can also introduce costs and space requirements.
Does buying twice always mean the first purchase was a mistake?
No. Your projects and skills may change. A tool that served its intended role was not necessarily a poor purchase. The avoidable mistake is buying equipment that was unsuitable for the known task from the beginning.
When should I add a specialist machine?
When you have a defined requirement, have compared suitable alternatives, and can accommodate the complete working setup. Frequency of use and the consequences of not owning it both matter.
Let Completed Projects Guide the Next Purchase
A workshop upgrade plan should evolve with the work you do.
Establish a complete basic setup, improve recurring difficulties, and add capability when your projects justify it. Check maintenance and simpler solutions before replacing equipment, then assess whether the change delivered the result you wanted.
Want another resource for planning your workshop’s development? View the current Ultimate Small Shop offer and decide whether its contents would help with your next stage.