A good small woodworking shop layout gives you room to move wood, operate tools, and assemble projects without constantly rearranging everything.
Start with the projects you want to build. Then map how materials will move from storage through cutting, shaping, and assembly. Position your equipment around that sequence, allowing for the space each tool needs while working.
The key distinction is simple: a machine’s footprint tells you where it sits. Its working area tells you whether you can use it there.
Affiliate disclosure: This article contains affiliate links. If you purchase through these links, we may earn a commission at no additional cost to you.
Working on your overall shop plan? Explore Ultimate Small Shop as an additional planning resource.
Start With Your Projects
Before drawing equipment into a floor plan, list three projects you expect to build.
A shop for small boxes has different needs from one used for bookcases. Long boards, large panels, and assembled cabinets all affect how much working space you need.
For each project, record:
- The largest material you expect to bring inside.
- The tools required for the main operations.
- The size of the assembled project.
- Where parts will wait between steps.
- Whether you need access to several sides during assembly.
This helps you identify your most demanding operation. It might be handling sheet goods, supporting long stock, or clamping a cabinet.
If you are still choosing your equipment and workspace, begin with our small woodworking shop setup guide.
Measure the Room and Its Fixed Obstacles
Draw the usable room before adding tools.
Measure the walls, then mark doors, windows, columns, stairs, low ceilings, and anything that must stay in place. Include shared storage and garage parking requirements.
Door swings matter. So do cabinet doors, overhead garage-door tracks, and the route used to bring materials inside.
Record the location of existing outlets and lighting, but do not assume they are suitable for every machine. Equipment requirements and any electrical changes need separate consideration.
Your base drawing should show:
| Feature | What to record |
|---|---|
| Entry doors | Opening width, swing, and approach |
| Windows | Position, height, and access needed |
| Fixed equipment | Location and required access |
| Shared storage | Footprint and door or drawer movement |
| Ceiling obstacles | Height and position |
| Utilities | Locations and access that must remain available |
Use actual measurements. A wall that looks empty may become unusable once you account for a door opening into it.
Our workshop layout templates guide explains how to turn these measurements into a reusable drawing.
Plan Three Layers of Space Around Each Tool
A floor plan becomes more useful when you distinguish three different space requirements.
1. Equipment footprint
This includes the machine, stand, fence rails, handles, and permanent accessories.
Measure the complete setup. The dimensions of a tabletop alone may leave out substantial parts of the machine.
2. Operating space
This includes the operator’s position, the workpiece’s travel, and any required supports.
Different tools use space differently. A miter saw needs lateral stock support. A table saw needs a clear material path through the cutting operation. A drill press may need room for a long workpiece to extend beyond its table.
3. Access space
Allow room to reach controls, connect extraction, change accessories, open service panels, and perform maintenance.
Use the manual for your exact equipment when establishing requirements. Grizzly’s site-planning guidance, for example, explicitly considers workpiece size, auxiliary equipment, and service access—not simply the machine’s footprint.
There is no single clearance measurement that works for every tool and project. For a broader look at usable floor area, see how much space a woodworking shop needs.
Map the Route From Lumber to Assembly
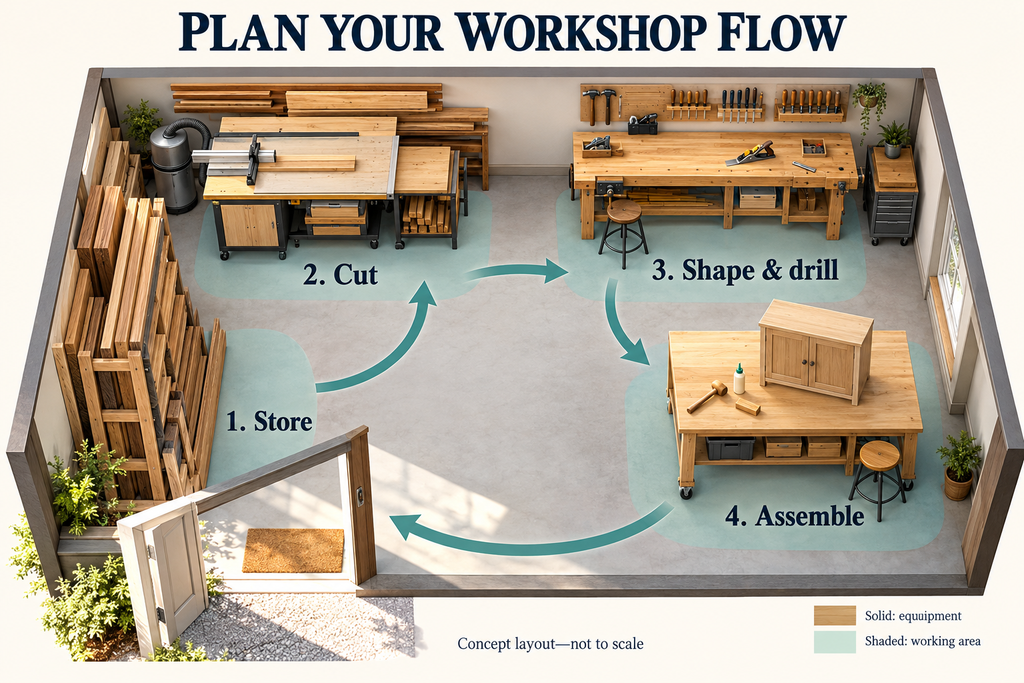
Think through one ordinary project from arrival to completion:
Material storage → preparation and cutting → shaping and drilling → assembly
Your layout does not need to form a perfectly straight production line. In a small room, some movement back and forth is unavoidable.
The aim is to reduce awkward handling.
For example, storing lumber near the entrance may shorten the distance you carry it. Keeping measuring tools near the preparation area can reduce repeated trips across the shop. Staging cut parts near the assembly bench keeps them from collecting on machine tables.
Ask these questions as you draw the route:
- Can I bring material inside without moving a machine?
- Where will I set it down?
- Can I turn a long board without striking storage?
- Where will completed parts wait?
- Can an assembled project leave through the doorway?
Our woodworking shop workflow guide explores this sequence in more detail.
Compare Three Practical Layout Approaches
Most small workshops use some combination of wall stations, central work surfaces, and movable equipment.
| Layout approach | Where it can help | Main limitation |
|---|---|---|
| Perimeter layout | Keeps the center available for handling and assembly | Wall-mounted stations can compete for long-stock space |
| Central work area | Provides access around a bench or assembly table | Can interrupt material paths through machines |
| Mobile layout | Lets tools share an operating area at different times | Requires setup, stable positioning, and a place to park equipment |
Perimeter layout
Place storage and suitable stations along the walls, leaving the center open.
This can suit a shop where the central area serves several purposes. However, lining every wall with deep cabinets may leave too little usable space.
Pay particular attention to corner conflicts. A cabinet beside a miter saw might block the very stock support area the saw needs.
Central work area
A freestanding bench can make assembly easier because you can reach multiple sides.
Check whether it interrupts the longest material path in the room. A bench that is convenient for glue-ups may be inconvenient when processing long boards.
See our guide to workbench and assembly-area placement before fixing its position.
Mobile layout
Movable tools can share floor space when used at different times.
Plan both their storage positions and their operating positions. Otherwise, the drawing may show a tidy parked shop that becomes crowded when work starts.
Use equipment-compatible bases or stands and follow their setup and stability instructions.
Comparing several possible arrangements? Take a look at Ultimate Small Shop while developing your layout and equipment plan.
Position the Most Space-Demanding Operation First
Start with the operation that places the greatest demands on your room.
If your projects depend on a table saw, map its material path before filling the surrounding space. Include stock support and the operator’s working position.
Do not assume the saw belongs in the center. Depending on the room, another orientation may provide a more practical path. Our table saw placement guide covers the factors to consider.
If you mainly use hand tools, your workbench may be the anchor instead. Position it around workholding, lighting, and access.
Then fit secondary stations around that main working area:
- Give a miter saw adequate space for the stock you actually cut.
- Position drilling equipment so workpieces can extend beyond the table.
- Allow router-table stock movement and access to adjustments.
- Keep frequently used measuring and marking tools near the bench.
For more detail, see small-shop miter saw station planning and router table and drill press placement.
Protect Assembly and Temporary Storage Space
Assembly space often disappears because it looks like unused floor area.
Reserve it deliberately.
Picture your largest likely project with clamps attached. Can you walk around it? Can you reach the joints? Can the project remain there while glue cures without blocking an exit or an essential operation?
Also reserve a modest staging area for unfinished parts. A shelf, cart, or designated section of a bench can keep parts organized between operations.
Without that space, projects tend to spread across tool tables. Each new operation then begins with moving the previous operation’s parts.
For examples of how these competing needs fit into different rooms, explore our small workshop floor plans.
Add Hoses, Cords, and Storage to the Drawing
A layout is incomplete until it includes the connections and accessories used during work.
Sketch extraction hose routes. Check that connections remain accessible and that hoses do not interfere with stock travel or walking routes.
Consider cords in both parked and operating positions. A mobile tool may reach its outlet when stored but need a different arrangement when moved into use.
Draw drawers and cabinet doors in their open positions. Check whether you can retrieve a clamp while a project occupies the bench.
These small details can expose problems before you build permanent storage.
Test the Layout With Floor Tape
Before installing cabinets or committing to machine positions, mark the proposed layout on the floor.
Use different tape colors for equipment footprints and operating areas.
With equipment switched off and disconnected where appropriate, walk through a representative project. Do not attempt a powered cut to see whether a questionable arrangement works.
Check the sequence:
- Bring material through the entrance.
- Move it to storage or preparation.
- Walk through each planned operation.
- Move parts to assembly.
- Open the drawers and cabinets you would need.
- Confirm that exits remain accessible.
Use lightweight mockups if handling real stock would be awkward.
Record each conflict, then adjust the drawing. A few small changes at this stage can prevent the recurring problems covered in our small workshop setup mistakes guide.
Frequently Asked Questions
Should every tool go against a wall?
No. Wall placement works for some stations, but other tools need access or material movement on several sides. Position each tool according to its operation and manufacturer’s instructions.
Can two tools share operating space?
Sometimes, if they are used separately and the inactive equipment does not obstruct the active operation. Draw each operating arrangement individually and preserve access and exit routes.
Should I build permanent storage first?
Test the main workflow first. Permanent cabinets are harder to reposition than a temporary shelf or movable cart.
What should I change if everything feels crowded?
Check whether storage, rarely used equipment, or oversized work surfaces occupy your most useful operating space. Reducing what stays permanently on the floor may help more than rearranging every machine.
Build the Layout Around a Real Project
The most useful small woodworking shop layout supports the work you actually do.
Measure the room, map material movement, allow for operating and service access, and protect assembly space. Then test the arrangement before making permanent changes.
Ready to develop your broader workshop plan? Explore Ultimate Small Shop here.